


 11:01 AM
 MISDUONG

Here’s a detailed guide for working with MUI (Multilingual User Interface) language packs on Windows 11 — useful for your IT environment (MISDUONG) when you need to deploy or manage multiple languages.
What is an MUI language pack?
“MUI” stands for Multilingual User Interface. It allows Windows to display menus, dialog boxes, and other interface elements in a different language from the base installation. (Wikipedia)
Basically: you have Windows installed (e.g., in English) and you add a language pack so the UI shows in another language (e.g., Vietnamese, French, etc.).
Why it matters in enterprise/IT environments
-
For global or multi‑regional deployments (users in Vietnam + Indonesia + Taiwan etc.), you’ll likely need language flexibility.
-
When building images or deploying via tools like System Center Configuration Manager (SCCM), you might want language packs pre‑injected to avoid post‑deployment configuration. (System Center Dudes)
-
For consistency across user profiles, system/Welcome screen, new user accounts, etc., you may need to copy settings (in e.g., Azure/Intune) so new users see the correct language. (MSEndpointMgr)
Step‑by‑step guide: installing a language pack (for a single machine)
Here’s how to do it on Windows 11 for an existing machine.


-
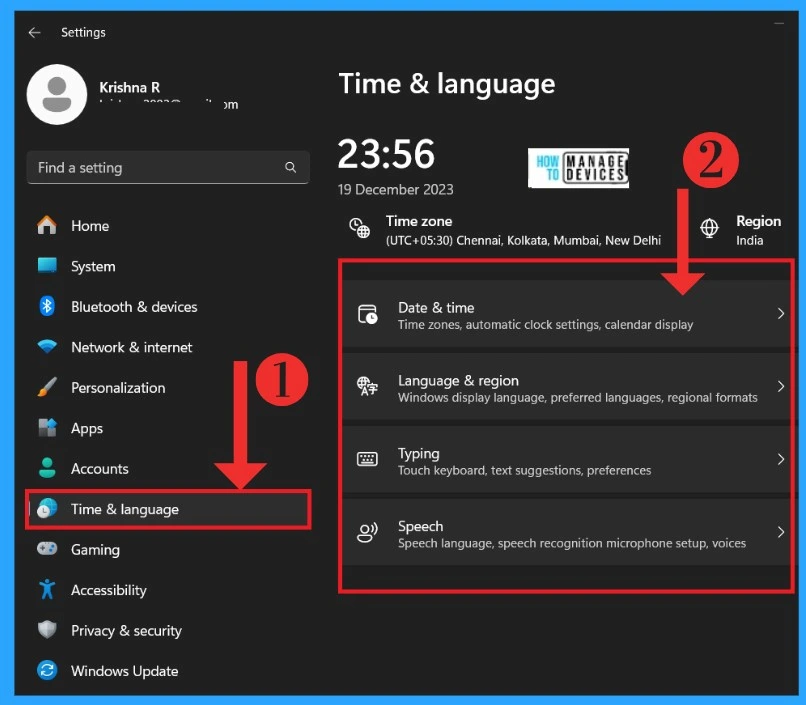
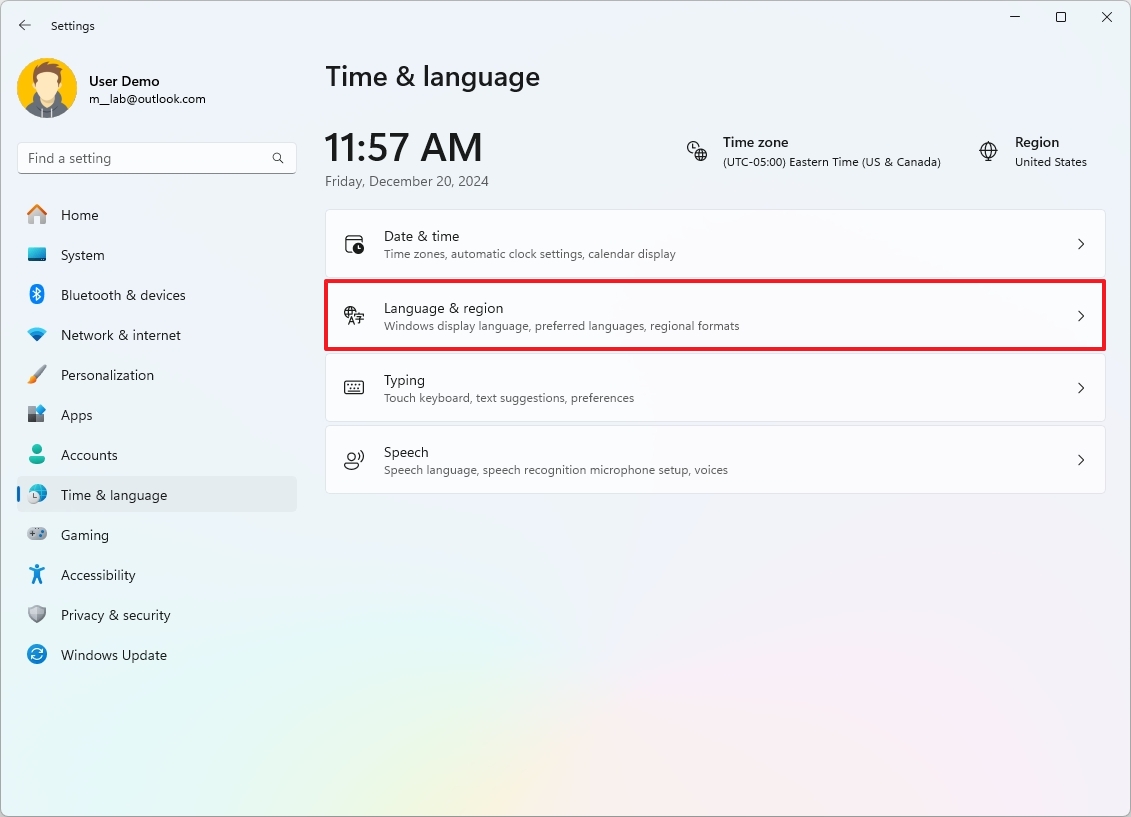
Go to Settings → Time & language → Language & region. (Microsoft Support)
-
Under Preferred languages, click Add a language. (Microsoft Support)
-
Search for the language you want (e.g., “Vietnamese / Tiếng Việt”) and select it.
-
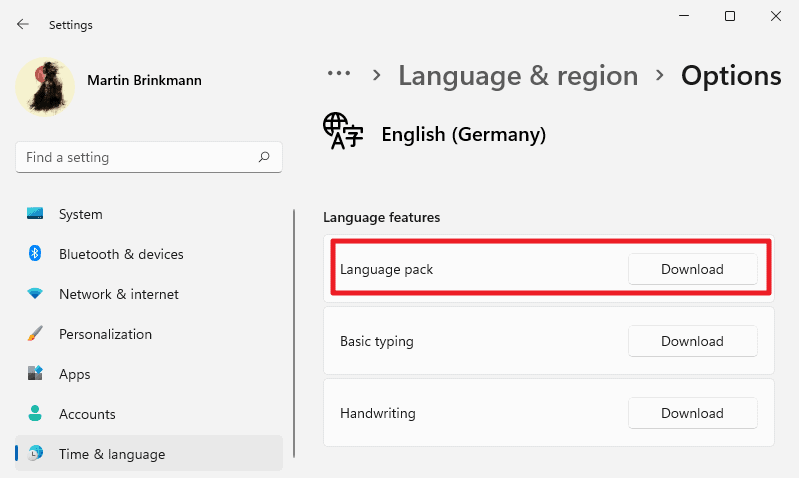
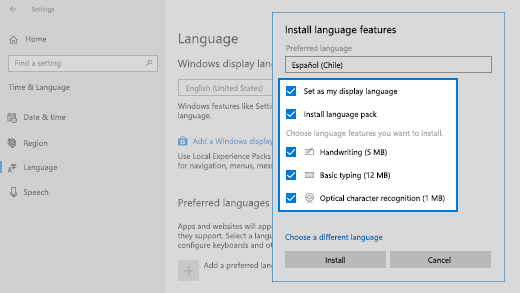
In the next screen choose the options:
-
Install language pack (make sure this checkbox is checked)
-
Set as my display language (if you want it to replace the current display language)
-
(Optionally) include features like Speech, Handwriting, Text‑to‑Speech if available for that language. (InformatiWeb)
-
-
Click Install. Wait while Windows downloads and applies the pack.
-
After installation you’ll likely need to sign out (or restart) for the change to fully take effect. (InformatiWeb)
-
After signing back in: verify in Settings → Time & language → Language & region that the “Windows display language” reflects your new choice. Also check Settings → Time & language → Speech if you installed speech recognition/voice features. (InformatiWeb)
-
Finally, adjust Regional format, Time zone, Date/Time settings, and keyboard input layout, if needed. For example if you moved from US settings to Vietnam you’d set the appropriate time zone, regional format. (InformatiWeb)
Considerations & Tips for enterprise deployment
Since you’re in IT and might be managing many machines, here are extra tips:
-
If you build images (for new machines) for multiple languages, you can inject language packs and Features‑On‑Demand (FOD) offline (in the image) so users don’t have to download at first boot. (System Center Dudes)
-
Use tools like DISM (Deployment Image Servicing and Management) to inject
.cabfiles of language packs, and add capabilities likeLanguage.Basic,Language.Handwriting,Language.Speech, etc. (System Center Dudes) -
When you deploy via Autopilot / Intune / SCCM: install the language pack first (system context), then apply settings (user context) to set the display language, input methods, etc. (MSEndpointMgr)
-
Make sure the version of the language pack matches the Windows version (e.g., 22H2, 23H2, etc) to avoid compatibility issues. (Microsoft Learn)
-
For multi‑language support: you can either have one host pool per language, or one host pool with multiple languages installed and let users switch. The second is more resource‑efficient but requires more configuration. (Microsoft Learn)
-
Watch for any “Single Language” editions of Windows: some editions restrict the number of display languages you can switch. For example older versions of Windows had limitations on Single Language SKUs. (Wikipedia)
Common issues & troubleshooting
-
After installing a language pack you may still see some parts of the UI in the old language (common with settings or system apps). Signing out or restarting usually fixes it. (InformatiWeb)
-
In enterprise deployments, if you install as system but user profile remains in old language, you will need to run script or use policy to copy language settings to new user accounts / Welcome screen. (MSEndpointMgr)
-
If languages are missing features (e.g., speech or handwriting) it may be because the language pack only supports UI but not full features in your region. You may need to install a “base” language pack then add a “regional variant”. Example: install French (France) pack then French (Belgium) on top of it. (InformatiWeb)
Specific for Vietnamese (Tiếng Việt) scenario
Since you are located in Vietnam (HCMC), you might want to apply Vietnamese language / region settings:
-
In “Add a language”, search for “Vietnamese / Tiếng Việt”.
-
After installation, set “Windows display language” to Vietnamese.
-
Under Region select Vietnam, and set the time zone to (UTC+07:00) Bangkok, Hanoi, Jakarta.
-
Keyboard layout: you may want Vietnamese (Telex) or similar input method if needed.
-
If you deploy multiple machines across sites (Vietnam, Indonesia, Taiwan), you can pre‑install Vietnamese, Indonesian (Bahasa Indonesia), Traditional Chinese (Taiwan) language packs in your image to support local users.
Summary
-
MUI language packs on Windows 11 allow UI localisation (menus, dialogs) in other languages.
-
For a single machine you install via Settings → Time & language → Add a language → Install, then sign out.
-
For enterprise deployment you should image with language packs / FODs pre‑injected and/or use scripts/policies to set user language settings.
-
Always align versions, do regional/time‑zone adjustments, and test user login to ensure all parts of UI are localised.

0 nhận xét:
Post a Comment