Translate

Sunday, September 8, 2013

What is Active Directory (AD)?


Active Directory is Microsoft's directory service that allows administrators to assign policies, deploy software, and apply updates for an entire organization. AD also allows users to store data in a central location, where it is backed up.

What are the benefits of Active Directory?


Active Directory is a state-wide authentication directory that supports enterprise systems, provides contact information and scheduling integration, along with providing mechanisms for centralized desktop management. There are multiple Active Directory (AD) environments in use across the University of Tennessee campuses and institutes. The purpose of the Active Directory Project is to migrate all of these environments into a single AD forest, which will provide the following benefits:
  • Single user name and password - NetID
  • Password synced between AD and LDAP Directory Services
  • Reduce overhead through standardization
  • Improve services through centralized management capabilities
  • Provide foundation for the following AD related services:
    • Exchange
    • SharePoint
  • Improve workstation security
  • Central storage provided for individuals and departments
  • Backup and restoration services for central storage
  • Server storage space for user documents
  • Backed up data on Home and Departmental drives
  • Lower departmental cost because infrastructure is managed and maintained by OIT

Saturday, September 7, 2013

How to disable Java in IE using Group Policy


You may already be aware there is a pretty serious vulnerability with Java that has just been patched (see Security Alert for CVE-2013-0422 Released ) on pretty much all versions of the program. For some people however this may get them questioning if they need Java installed at all on their computers. Personally I have uninstalled Java off my friends and family computers for the past few years without anyone every complaining. Certainly other Microsoft MVP;s are also finding that having Java disabled in the browser seems to have little of no affect (see https://twitter.com/troyhunt/status/290589939782000641 ) as most
 web sites no longer user Java applets. However as an avid gamer IT Professional I am fully that some programs require Java to be installed to allow the full desktop apps to work (like Minecraft). So you may be please to know there is a way to Disable Java in Internet Explorer thus greatly reducing the risk of having Java installed…
While Java is not normally configured via a registry thanks to @rickd4real (Via) @stealthpuppy I have been able to extract the Group Policy Preference Registry file that you can quick import into your GPO to disable Java in IE for Users of Computers.

Disable Java in IE1           Disable Java in IE2                   Disable Java in IE3

Disclaimer: Use at your own risk. I am trusting the registry keys provided are sufficient to disable Java.
Update: Additional info at Microsoft KB : http://support.microsoft.com/kb/2751647

Updated: How to download and install the Group Policy Management Console (GPMC)


One of the common task that Group Policy administrators need to do is download and install the Group Policy Management Console (GPMC) on their computer to allow them to make changes to Group Policy. This tool is by default not installed on Windows Server 2008 R2 or Windows 7. Below I first go through the Windows 7 and then the Windows Server 2008 R2 install procedure…

Windows 7

The install is slightly different for Windows 7 as the install file for the GPMC are not actually part of the Windows 7 installation so you first need to download and install the the Remote Server Administrator Tools (RSAT) on your computer.
Step 1. Downloads for either the 32bit or 64 bit of the RSAT for Windows 7 from the link below.
Update: RSAT now supports Windows 7 Service Pack 1…
http://www.microsoft.com/downloads/details.aspx?displaylang=en&FamilyID=7d2f6ad7-656b-4313-a005-4e344e43997d
Step 2. Once you have download the RSAT Microsoft Update Standalone Package (.MSU) for your platform install it by simply double clicking on the file.
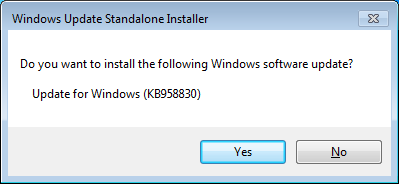
Step 3. You will then be prompted to install this update onto your computer
image
Step 4. Read the licence terms and click “I Accept” (if you accept the terms).
image
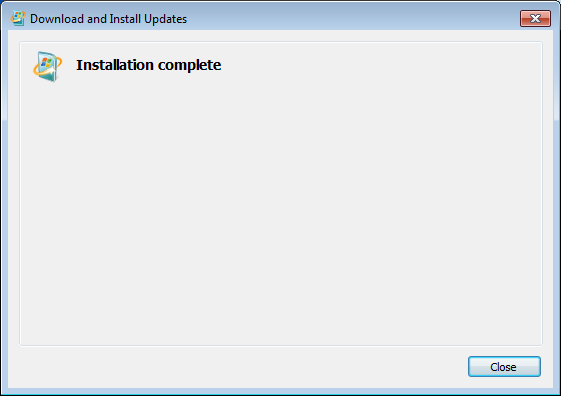
Step 5. Click Close
 image
Now you could follow the rather lame text only instructions for installing the RSAT tools…
image
Or you can follow the nice instructions I have done below with text and IMAGE!!!
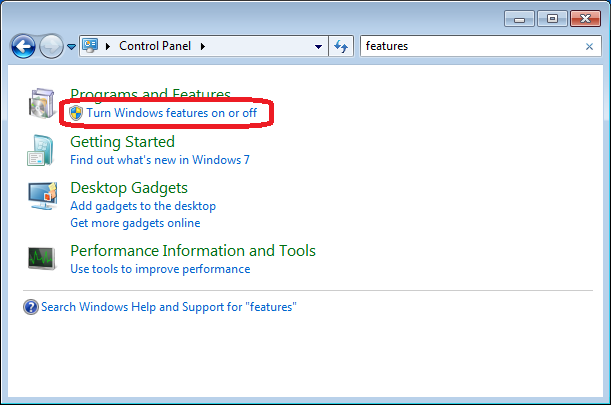
Step 1. Open Control Panel and type “features” in the search bar and click on “Turn Windows features on or off”.
image
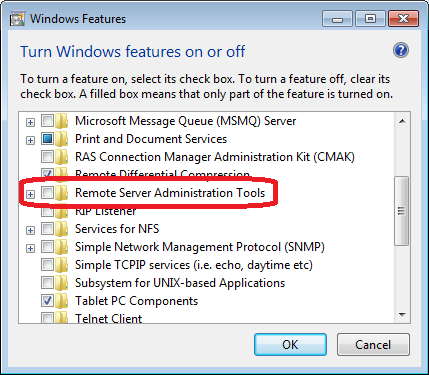
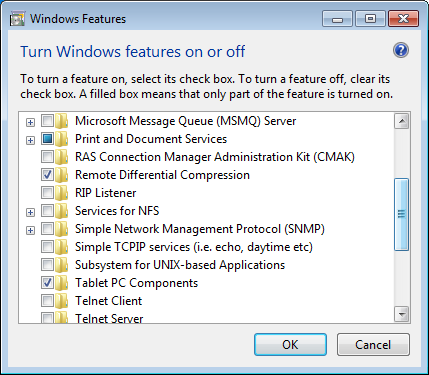
Click 2. Expand “Remote Server Administration Tools”
Note: You can see the “Remote Server Administration Tools” in the Feature List after you install the MSU file.
New Old
image image

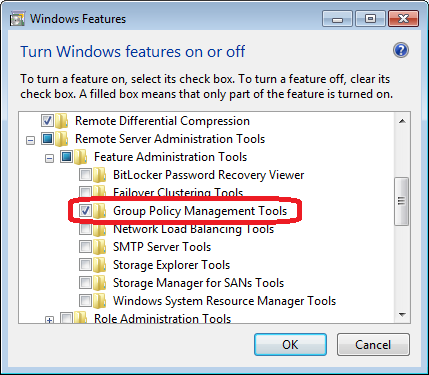
Step 3. Expand “Feature Administration Tools” and tick “Group Policy Management Tools” and click “OK”
image
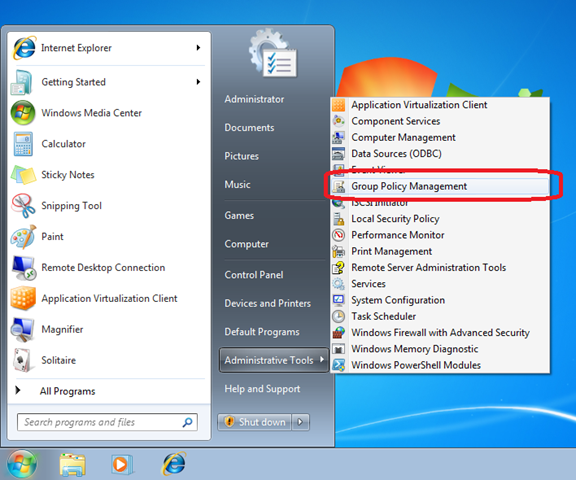
Step 4. One its finished installing you can now go to the “Administrative Tools” and you will find the “Group Management Tools” is now listed.
image
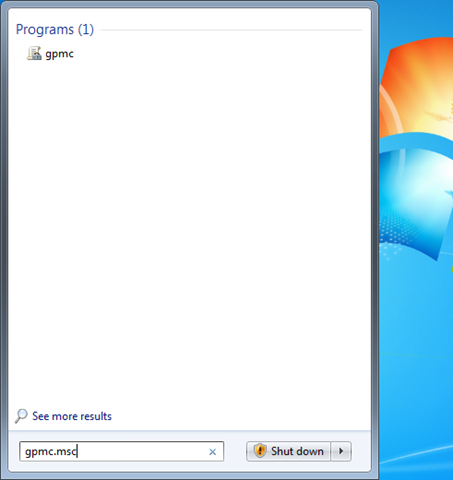
Alternatively… I find a quicker way to launch the GPMC is to just click start and type “gpmc.msc” and press “Enter”
image

Windows Server 2008 R2

Thankfully its a LOT easier to install GPMC on Windows Server 2008 (and R2) and the install file for the Remote Server Administrator Tools are already on the drive.
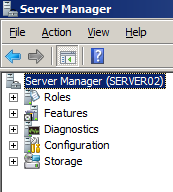
Step 1. Open “Server Manager”
image
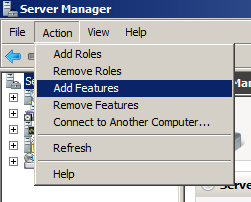
Step 2. Then click on the “Action” menu and then click “Add Features”
image
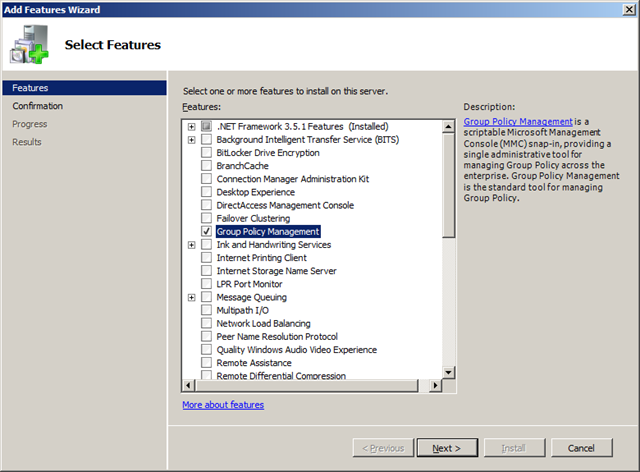
Step 3. Tick “Group Policy Management” and click “Next”
image
Step 4. Click “Install”
image
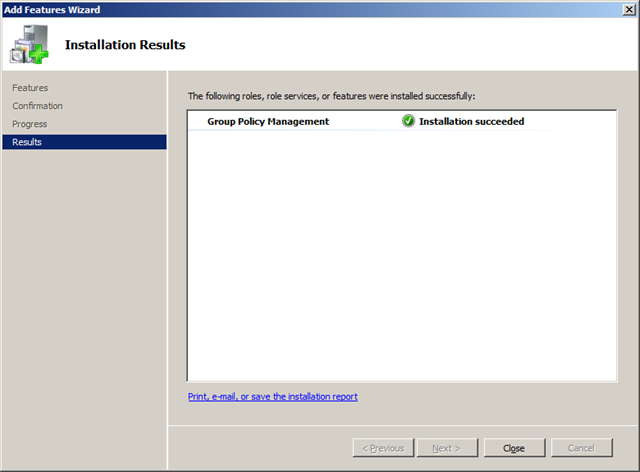
Step 5. Click “Close”
image
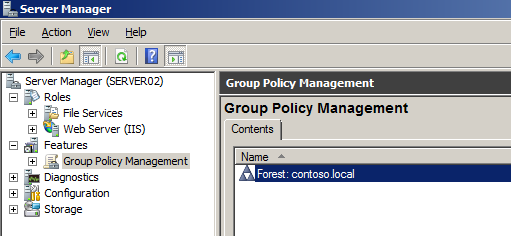
You can now run the Group Policy Management Console from within Server Manager (see below) or launch it as a standalone console the same as with Windows 7.
image
Happy group policy editing…
How to use Group Policy to remove the Network Connectivity Status Indicator message in your network icon


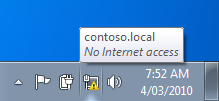
Windows has a cool feature that allows you to tell if your computer has Internet connectivity when you are connected to a network (see image below). This feature is called Network Connectivity Status Indicator (NCSI) it uses a combination of DNS and/or HTTP look ups to tell if you are connected to the Internet. The way does this is either via a HTTP request for http://www.msftncsi.com/ncsi.txt or a DNS look up for dns.msftncsi.com that resoles to 131.107.255.255
image

Windows 7

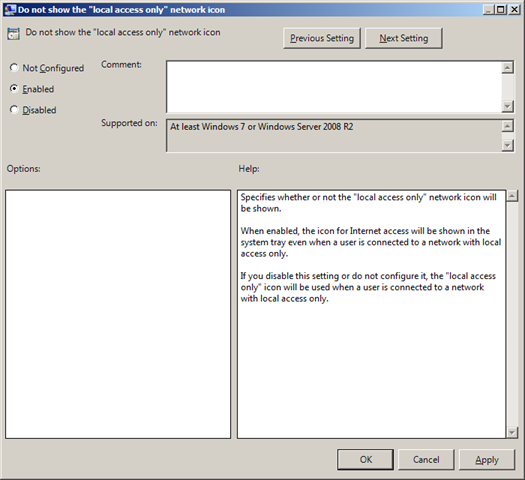
However if you find this error message really annoying there is now a Windows 7 group policy will turn it off. This is a machine setting so edit a Group Policy Object that is applied to all the workstations you want to turn this message off. Then navigate to Computer Configuration > Policies > Administrative Templates > Network Connections and enabled the “Do not show the “local access only” network icon” policy setting.
image
TADA… Now you will no longer see the exclamation icon on the network icon.
image
For more information on how NCSI works and this Windows 7 policy see http://technet.microsoft.com/en-us/library/ee126135(WS.10).aspx

Windows Vista

Unfortunately Windows Vista does not have the same Group Policy however there is a registry key that can be applied using Group Policy Preferences that has the same affect.
Key: HKLM\SYSTEM\CurrentControlSet\Services\NlaSvc\Parameters\Internet
Value: EnableActiveProbing
Data: 1 (REG_DWORD) = Enabled
Data: 0 = Disabled
Step 1. Edit a Group Policy Object that is applied to all the workstation you want this Browser Ballot disabled.
Step 2. Navigate to Computer Configuration > Preferences > Windows Settings > Registry and create a “New Registry Item”
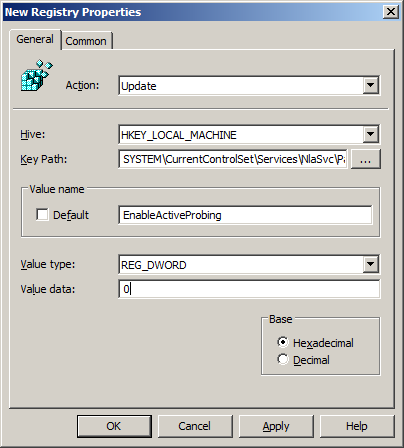
Step 3. Type “SYSTEM\CurrentControlSet\Services\NlaSvc\Parameters\Internet” in the Key Path then type “EnableActiveProbing” in the Value name, then select REG_DWORD as the value type “0” in the value data and then click “OK”.
image
For more information on how NCSI works and this Windows Vista policy see http://technet.microsoft.com/en-us/library/cc766017(WS.10).aspx

How to use Group Policy to remove the Adobe Reader desktop shortcut


One of the most annoying things about Adobe Reader is that it is in need for constant updating to newer version due to security issues. While this is true for most software packages whenever you install an Adobe Reader update it also restores the desktop icon even if it has already been deleted. (Annoying!!!).
Note: for more information on using Group Policy to secure Adobe Reader see my previous article Permanent Link to How to make Adobe Reader more secure using Group Policy
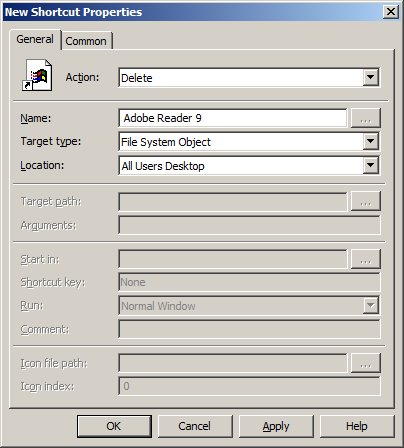
So below I go through how to use one of the new Group Policy Preferences options is called “Shortcuts” to remove the icon when ever it is re-instated (see below). While in this example I use (pick on) Adobe Reader it can also be used as a guide for removing any other shortcut that you so desire.
image
Step 1. Edit a GPO that targets the computers that you want to apply the home page setting.
Step 2. Navigate to User Configuration > Preferences > Control Panel Settings > Windows Settings
Step 3. Click on the “Action” menu and click on “New” and then click on “Shortcut”
Step 4. Change the Action to “Delete” then select “All Users Desktop” and then type “Adobe Reader 9” in the name field.
image
Now wait time you install an Adobe Reader update all you have to do is wait for the next group policy refresh and the shortcut will be gone… (Yes).
image

Group Policy Setting of the Week 22b – DNS Servers


I used to think that it was not possible to set IP address information via Group Policy however I did some checking this week and was pleased to find that there was a way to configure your computers DNS Server addresses. Unfortunately this setting only applies to Windows XP, however lots of people still use XP so it is still somewhat relevant. This setting is simple called “DNS Servers” and can be found under Computer Configuration > Administrative Template > Network > DNS Client.
image
Figure 1.
To configure this setting simple check Enabled and type each IP address of the DNS Servers with a space between them.
While DNS Server settings are normally configured via DHCP this option can be really handy when you have two separate Active Directory forests on the same LAN. This is common where two companies have physically merged but still run separate AD’s forests connected to the same network. Now for name resolution you can setup DNS forwarders from forest A to forest B however this does not work for dynamic DNS registrations of the computer names.
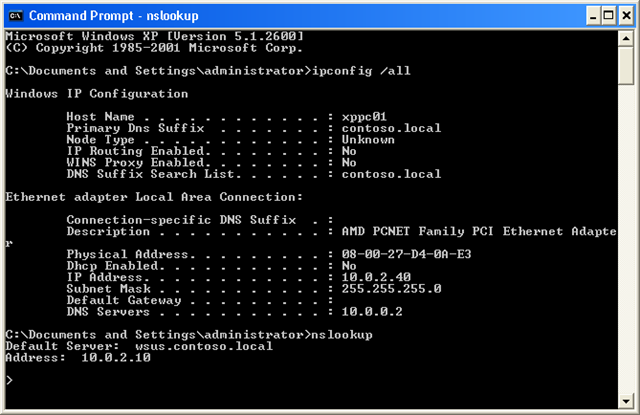
Note: When this setting is applied its a little bit tricky to confirm that it has actually applied as both the network properties (see figure 2.) and even and ipconfig /all will show the manually configured IP DNS setting (see figure 3.). However if you do a NSLOOKUP (also see figure 3.) you will notice that the DNS server that it uses is the DNS Server that is configured in the Group Policy or alternatively you can just rely upon an rsop.msc report.
image
Figure 2.
image
Figure 3.

How to use Group Policy to enable the “Search Companion” as the default search in Windows XP


Windows Desktop Search 4.0 is a fantastic local search engine for Windows XP that allows users to quickly search all their local files and network file servers. This is also a requirement for anyone that want to use the instant search feature in Outlook 2007 as it utilises this search engine to perform an index of your inbox.
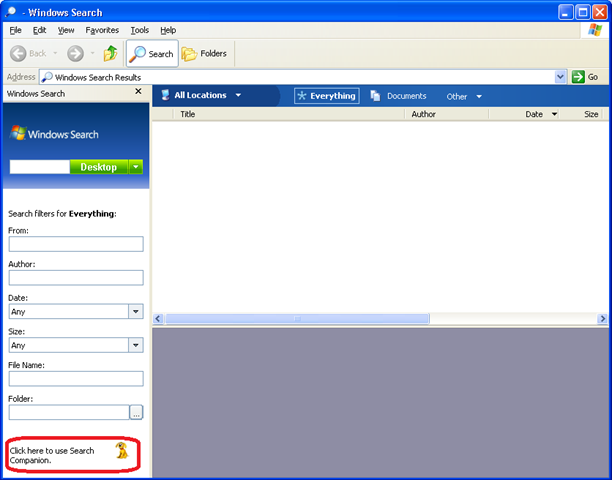
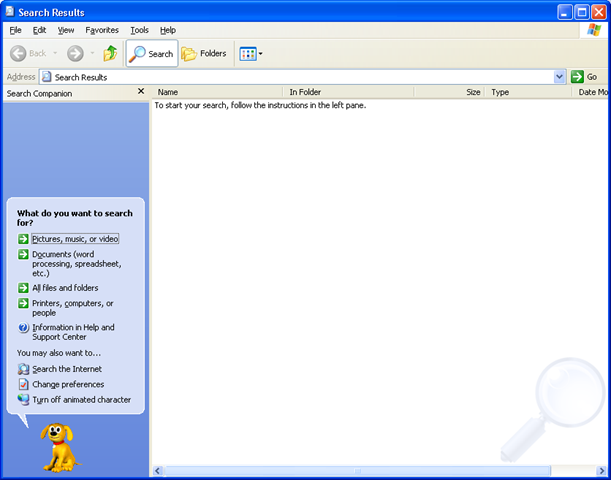
However as you can see the user interface for the search is much different and by default will not perform non-indexed search’s of network file share without setting up a search location. The problem is that for some users this is a lot to get used to and they quite often go back to using the “Search Companion” (see circled in red).
image
So there is a registry key you can configure if you want to make the “Search Companion” the default search provider for Windows XP but you don’t want to remove the Windows Desktop Search because of all the goodness it give you in Outlook 2007

Search Companion Registry Key Details

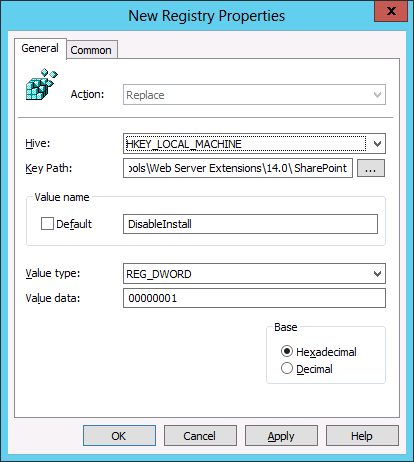
Key: HKCU\Software\Microsoft\Windows Desktop Search\DS
Value: ShowStartSearchBand (REG_DWORD)
Data: 0 (zero)

How to enable Search Companion

Step 1. Edit a Group Policy Object that is targeted to the users that you want to enable the search companion option.
Step 2. Navigate to User Configuration > Preferences > Windows Settings > Registry
Step 3. In the menu click on Action > New > Registry Item
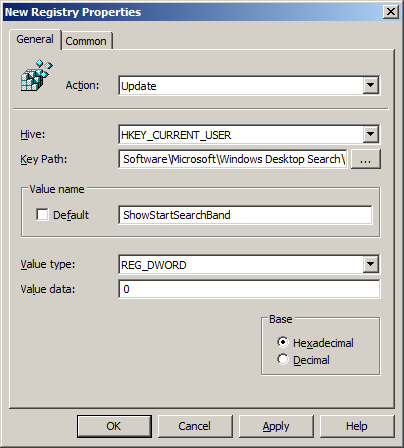
Step 4. Setup the following for your new registry item
 image
Once the policy is applied to your users the search command from explorer or from the start menu you will launch the “search companion” by default.
image
Source: http://jamielesouef.com/microsoft/change-windows-desktop-search-to-search-companion/
Listen

How to block installing SharePoint Server 2010 using Group Policy


SharePoint 2010 is quickly being coming a very popular web platforms for many organisation for collaborating and sharing information. In some cases it is almost to popular in some medium to large organisation with many SharePoint server farms popping up all over the place as each department or business unit see’s a need. As a quote from a Microsoft article says:
 
Because deployments of Microsoft SharePoint 2010 Products are managed at the farm level, a single SharePoint deployment has no information about other SharePoint deployments that might exist in the same enterprise.
Therefore Microsoft has provided a registry key you can create on your server to ensure that SharePoint will not install.
Key: HKLM\Software\Policies\Microsoft\Shared Tools\Web Server Extensions\14.0\ SharePoint\
Value: DisableInstall (REG_DWORD)
Data: 00000001
Step 1. To deploy this key create a new GPO with the following Group Policy Preferences Registry Extension and link it at the domain in your organisation.
image
Then if anyone tries to install SharePoint 2010 on a server in your organisation they will get this message:
SharePoint installation is blocked in your organization. Please contact your network administrator for more details.
However you may want to have SharePoint 2010 installed on your approved server so you will need a way for this setting to be removed for these approved servers.
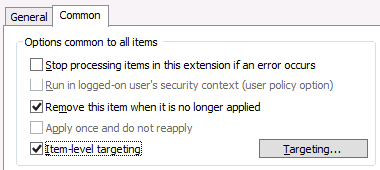
Step 2. To do this go to the common tab and tick the “Remove this item when it is no longer applied” option. This way the registry key will be deleted for any server that is approved to have SharePoint 2010. Then tick “Item-level targeting” and then click the “Targeting…” button. (Hence the Replace is used in step 1).
image
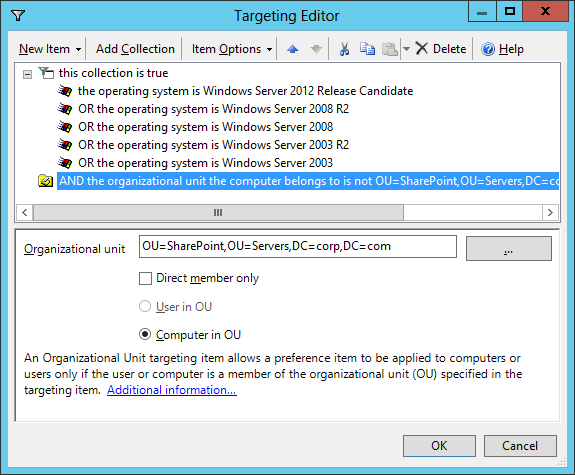
Step 3. Option #1 would be to target the setting to NOT apply if the server computer account is in the “SharePoint” server OU. This is obviously only practical if all you SharePoint servers were grouped together in one OU.
sharepoint1
Step 3. Option #2 would be to target the setting to NOT apply if the server computer account is in the “SharePoint Servers” security group. This option is more suited if you have servers spread out over your organisation.
sharepoint1
Note: In both examples I have added a condition that this setting will only apply to server operating systems therefore avoiding the key to get pushed to on to any of the workstations in the organisations.
Now hopefully armed with this information you can control the sprawl of SharePoint in your organisation…
References: http://technet.microsoft.com/en-us/library/ff730261.aspx

How to enable and configure Group Policy setting in Windows RT


Along with the recent release of Windows 8 Microsoft also released Windows RT which is pretty much Windows 8 designed to operate on ARM based processors. For consumers the most obvious difference of this OS is the lack of ability to run legacy software. In enterprises however the biggest missing feature is that this OS is not joinable to a domain and thus cannot be configured using Group Policy.
HOWEVER…. It is still possible with a very minor configuration changes to enable a Windows RT device to be configured via Local Group Policy.
To begin with, you might remember my blog post What’s changed with the Group Policy Client Service in Windows 8 where I explain that the Group Policy service will shutdown after a period of 10 minutes when not in use. Well, with Windows RT there are no Local Group Policy settings configured out of the box so by default the Group Policy Client service is as always disabled. Therefore before we configure the local group policy on a Windows RT device we first need to enable the local group policy service which you can get into via the Computer Management option from the system menu (See image below).

Once you are into the Computer Management tool navigate to the Services section and find the Group Policy Client Service.
Note: As mention before this service is disabled by default in Windows RT.

Now configure the Group Policy Service start up type to be Automatic and then manually start the service.

Now that the services is started you will be able to modify any of the Local Group Policy as per normal by setting by running “MMC” from the start menu then loading the Local Computer Policy snap in. As you can see in the image below I have used the Local Policy to configure the Default Lock Screen image as I mention in my previous blog post How to use Group Policy to change the Default Lock Screen image in Windows 8

That is pretty much it… ]While it is still disappointing that these devices cannot be managed via Group Policy at least you can still configure the policy settings on these device when you just want to make some minor tweaks.
Side Note: This blog post was completely written using on a Windows RT, for those of you who are lamenting the fact that there is no Windows Live Writer for Windows RT the blogging feature in Word 2013 is pretty much an exact replacement for this application (see image below).

 
Design by IT Manager | Bloggerized by Themes For IT Managers | MIS-DUONG