Translate

Saturday, August 1, 2015

Ultimate list of all Windows keyboard shortcuts with Win keys


Ever since Windows 95, the Windows key (or Win key) is ubiquitous on PC keyboards. With each new release of Windows, Microsoft has added new keyboard shortcuts with the Win key. Here is a complete list of all Winkey shortcuts.

The Win key when pressed by itself opens the Start Menu on systems which have it. On Windows 8 it opens the Start screen. Here are all the other Win key combinations which you may not be aware of:
Win+A: Does nothing
Win+B: Moves the focus to the notification area (System tray)
Win+C: Shows Charms, and the date & time (Windows 8 and later)
Win+D: Shows the Desktop. When you press Win+D again, it restores the open windows.
Win+E: Opens Explorer
Win+F: Opens file search. Prior to Windows 8, this opened Explorer search. Now it opens the Search pane with Files selected for searching
Win+Ctrl+F: Opens the Find Computers dialog (for Active Directory/domain joined PCs)
Win+G: Brings gadgets to the top of other windows.
Win+H: Opens the Share charm on Windows 8
Win+I: Opens the Settings charm on Windows 8
Win+J: Does nothing
Win+K: Opens the Devices charm
Win+L: Locks the PC or lets you switch users
Win+M: Minimizes all windows. Win+Shift+M does undo minimize all
Win+N: Does nothing in Windows. In Microsoft OneNote, it opens a new Note.
Win+O: Locks or unlocks the orientation of the device if it's a tablet PC so if even if you rotate it, it won't rotate
Win+P: Opens the UI to project to another display or projector
Win+Q: Opens the app specific search in Windows 8.1. e.g. In Modern IE, it will search Internet Explorer. In PC Settings, it will search Settings and so on.
Win+R: Opens the Run dialog
Win+S: Opens the search with "Everywhere" selected
Win+T: Focuses on the taskbar icons. Pressing Win+T again moves the focus to the next icon.
Win+U: Opens Ease of Access Center (or Utility Manager in Windows XP/2000)
Win+V: Focuses on the Metro style toast notifications and cycles through them
Win+W: Opens the search pane with Settings selected
Win+X: Opens the Power Users menu on Windows 8 and later. On Windows 7/Vista, it opens Mobility Center
Win+Y: Does nothing
Win+Z: Shows the App Bar in a Modern app, same as right clicking inside a Modern app
Win+1/2/3....0: Opens or switches to the correspondingly numbered Taskbar button
Win+'+': Opens Magnifier and zooms in
Win+'-': Zooms out in Magnifier
Win+Esc: Exits Magnifier if it's running
Win+F1: Opens Help and Support
Win+Pause/Break: Opens System Properties
Win+Print screen: Takes a screenshot in Windows 8 and saves it to the Screenshots folder
Win+Home: Same as Aero Shake (minimizes all windows except the foreground window)
Win+Left arrow key: Snaps a desktop app's window to the left. In Windows 8.1, it also snaps a Modern app's window to the left.
Win+Right arrow key: Snaps a desktop app's window to the right. In Windows 8.1, it also snaps a Modern app's window to the right.
Win+Up arrow key: Maximizes a window. In Windows 8.1, it also makes a snapped Modern app full screen.
Win+Down arrow key: Minimizes a window. In Windows 8.1, it suspends a Metro app and takes you to either the Desktop or the Start screen depending on your Start screen settings
Win+Page Down: In Windows 8.0, it moves a Modern app's window to the next display if multiple monitors are connected. In Windows 8.1, this shortcut is moved to Win+Shift+Right arrow key to be consistent with desktop apps
Win+Page Up: moves a Modern app's window to the previous display if multiple monitors are connected. In Windows 8.1, this shortcut is moved to Win+Shift+Left arrow key to be consistent with desktop apps
Win+Enter: Starts Narrator (on Windows 8 and later)
Win+Alt+Enter: Starts Media Center
Win+Space: In Windows 7, it does an Aero Peek. In Windows 8, it switches the input language
Win+Comma (,): In Windows 8, this is the new key for Aero Peek
Win+Period (.): Shows you which is the active window (useful when two Modern apps are snapped).
Win+Tab: In Windows 8 and later, when you press Win+Tab and release it, you can switch between Modern apps, the Start screen and the Desktop. If you continue to hold the Win key, it will show you the Switcher UI and when you let go of the Win key, it will switch. In Windows 7/Vista, Win+Tab shows Flip 3D which operates similarly.
Ctrl+Win+Tab: Shows the Switcher UI in sticky mode so you can use keyboard arrow keys or mouse to switch. Ctrl+Win+Tab also opens Flip 3D in sticky mode in Windows 7/Vista
Let us know if we missed any Win key shortcuts and tell us if you discovered any new ones from this article. :)

How to install a MUI language CAB file in Windows 10


In the previous post I collected and posted here a bunch of direct links to MUI language packs for Windows 10. It is useful for users who need to install them on multiple PCs. They will save their Internet bandwidth and time by not downloading them again on each PC. Instead, they can save the offline package and use it for future installs. In this article, we shall see how to install these downloaded language packs.

First, make sure that you have the correct language pack matching your OS (32-bit or 64-bit). Installing the CAB MUI language packs requires few steps.
Follow these simple instructions to install the CAB files:
  1. Press Win + R keys together on the keyboard to bring up the Run dialog.
    Tip: see the ultimate list of all Windows keyboard shortcuts with Win keys.
  2. Type the following in the Run box:
    lpksetup.exe
    lpksetup windows 10
    Press Enter.
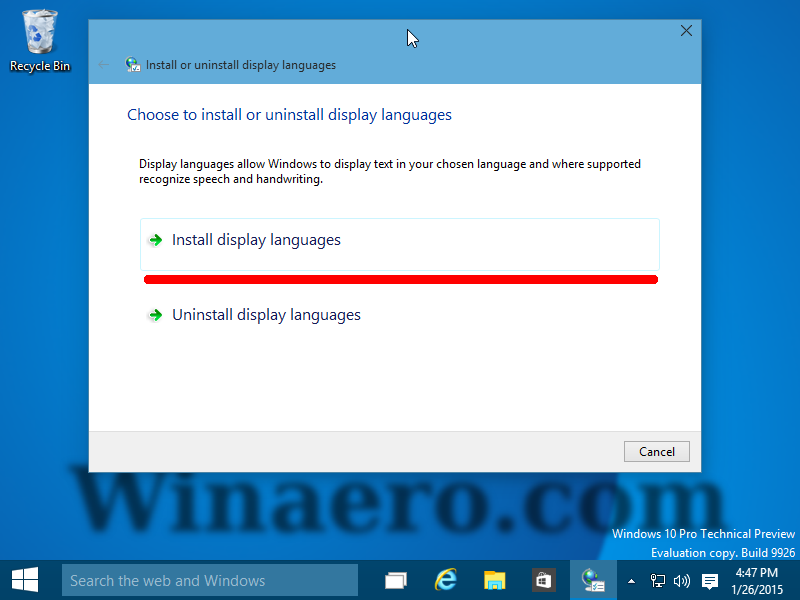
  3. The "Install or Uninstall display languages" wizard will appear on the screen.
    install language pack Windows 10
    Click the Install display languages button.
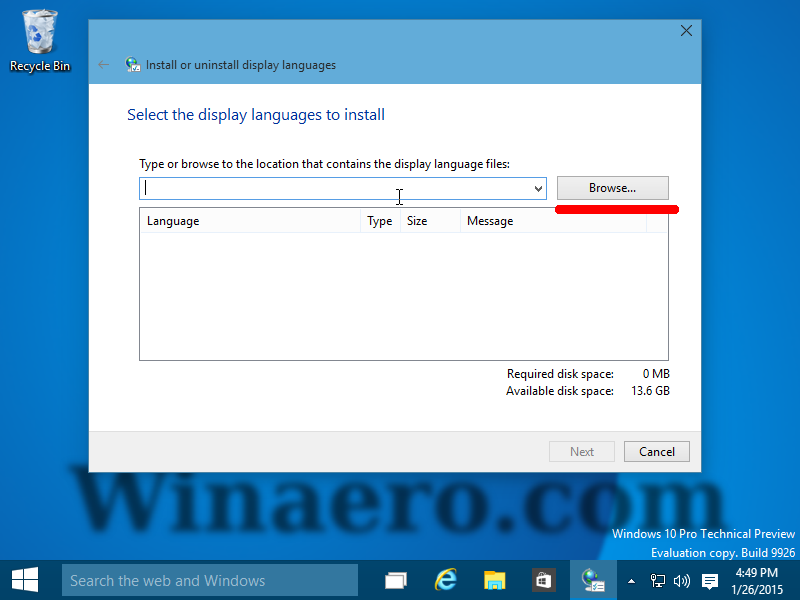
  4. In the next page of the wizard, click Browse and pick the *.cab file of the MUI language you downloaded. browse for language CAB Windows 10
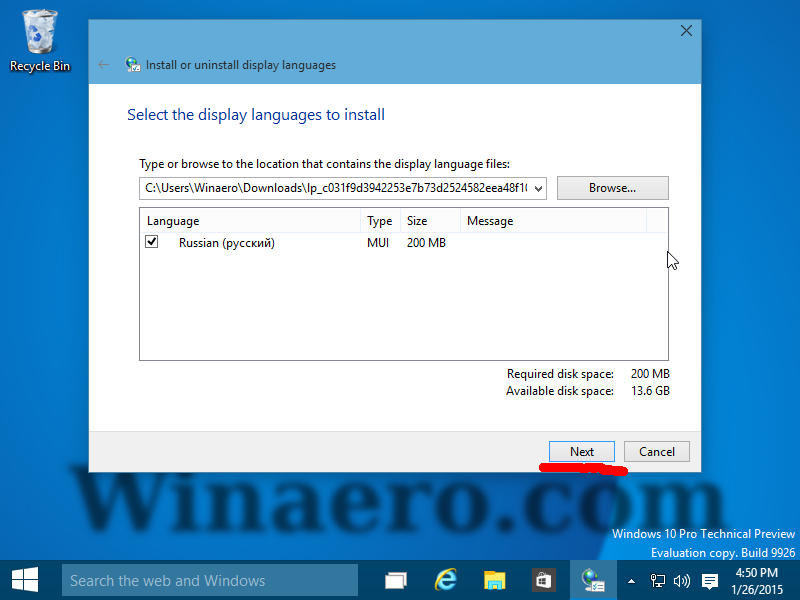
  5. Click the Next button:
    russian windows 10
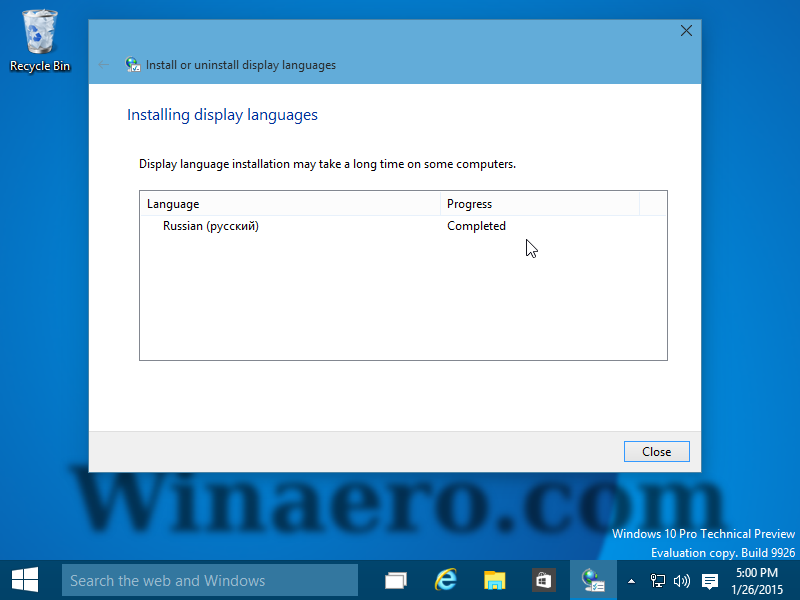
    Wait till it is installed. This can take a considerable amount of time and disk space.
    installing
    A System Restore point will also be created first.
    Windows MUI installed
  6. To switch to the installed language pack for your user account, you have to open the following Control panel applet:
    Control Panel\Clock, Language, and Region\Language
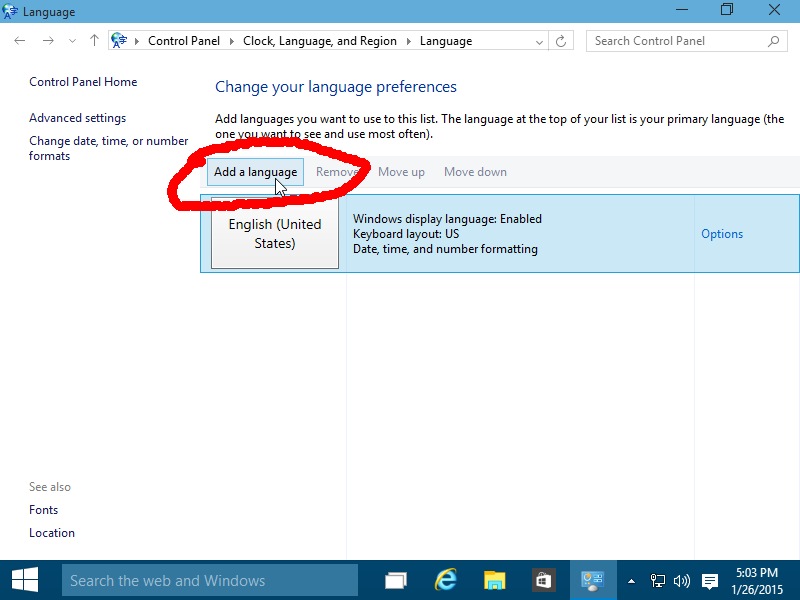
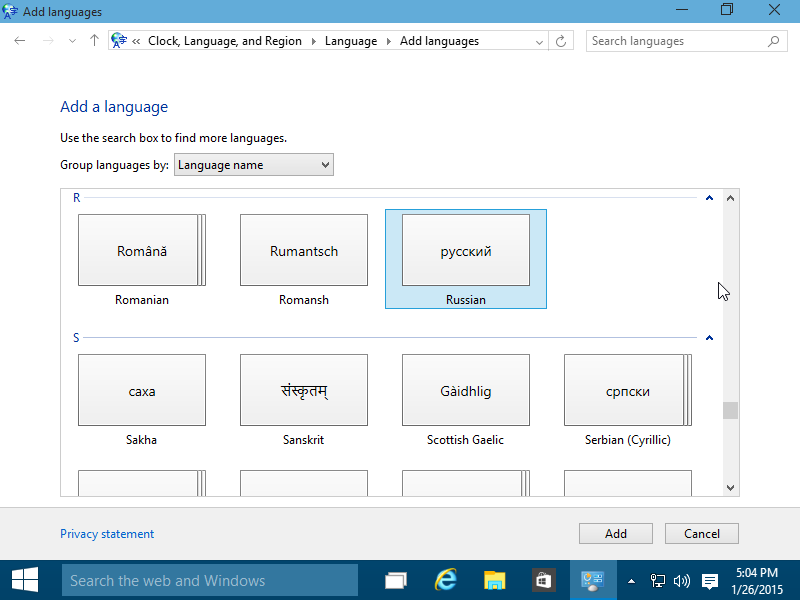
  7. Click here "Add a language and add the language you installed:
    add a language Windows 10 add new language Windows 10
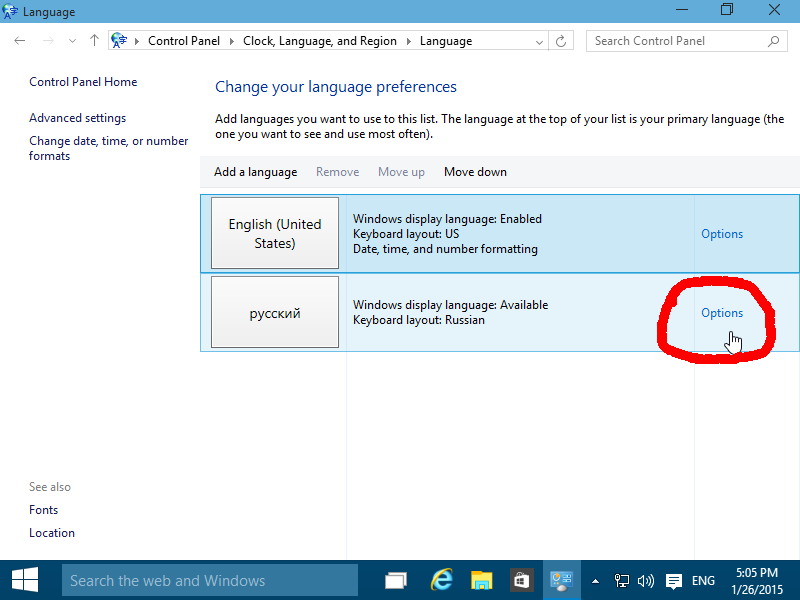
  8. Click the Options link on the right side of the just installed language. Windows 10 language options link
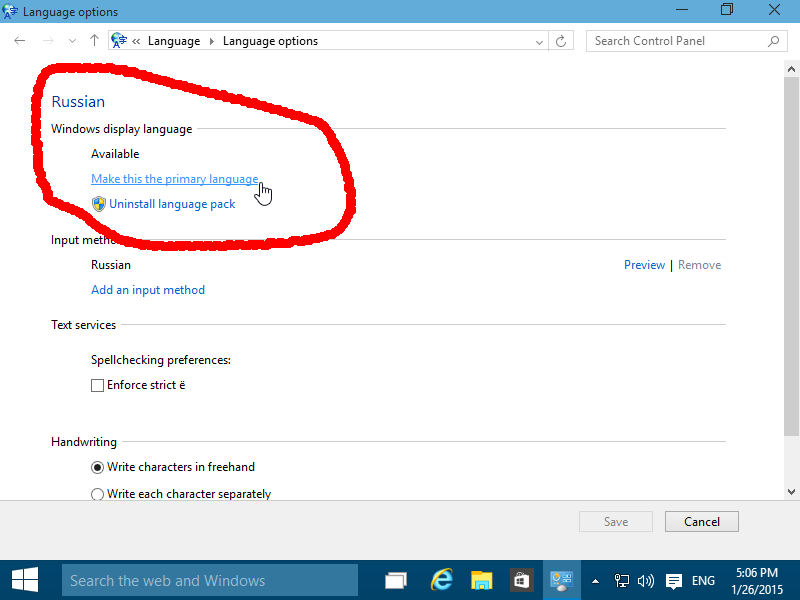
    There, you will find the ability to activate it as the main display language.
    set display language Windows 10
    Log out and log in again for the language to change.
That's it. Now you know how to deal with downloaded *.cab files for MUI language packages.

Download official MUI language packs for Windows 10 build 9926


Microsoft has released MUI (Multilingual User Interface) language packs for Windows 10 build 9926. These language packs allow you to apply a new display language for your OS. While all of them are available through Windows Update or via the Language Control Panel in Windows 10, you might be interested in downloading the language pack you use permanently to your hard drive, e.g. to install it on multiple PCs at once, or if you don't want to download the huge files all over again after you reinstall Windows. Here is a huge set of direct links for MUI language packs for Windows 10 build 9926.

Before you proceed, read the following article: How to install an MUI language CAB file in Windows 10.

Windows 10 64-bit (x64) MUI language packs

windows 10 logo banner 3
LanguageDownload link
ar-sa (Arabic)Download link
ca-es (Catalan "Spain")Download link
cs-cz (Czech)Download link
de-de (German)Download link
en-gb (English - United Kingdom)Download link
en-us (English - United States)Download link
es-es (Spanish)Download link
es-mx (Spanish "Latin America")Download link
fi-fi (Finnish)Download link
fr-fr (French)Download link
fr-ca (French "Canada")Download link
hi-in (Hindi "India")Download link
it-it (Italian)Download link
ja-jp (Japanese)Download link
ko-kr (Korean)Download link
nl-nl (Dutch)Download link
pl-pl (Polish)Download link
pt-br (Portuguese - Brazil)Download link
ru-ru (Russian)Download link
sv-se (Swedish)Download link
th-th (Thai)Download link
tr-tr (Turkish)Download link
vi-vn (Vietnam)Download link
zh-cn (Chinese - Simplified)Download link

Windows 10 32-bit (x86) MUI language packs

LanguageDownload link
ar-sa (Arabic)Download link
ca-es (Catalan "Spain")Download link
cs-cz (Czech)Download link
de-de (German)Download link
en-gb (English - United Kingdom)Download link
en-us (English - United States)Download link
es-es (Spanish)Download link
es-mx (Spanish "Latin America")Download link
fi-fi (Finnish)Download link
fr-fr (French)Download link
fr-ca (French "Canada")Download link
hi-in (Hindi "India")Download link
it-it (Italian)Download link
ja-jp (Japanese)Download link
ko-kr (Korean)Download link
nl-nl (Dutch)Download link
pl-pl (Polish)Download link
pt-br (Portuguese - Brazil)Download link
ru-ru (Russian)Download link
sv-se (Swedish)Download link
th-th (Thai)Download link
tr-tr (Turkish)Download link
vi-vn (Vietnam)Download link
zh-cn (Chinese - Simplified)Download link

Friday, July 31, 2015

Disable or enable Windows Defender in Windows 10


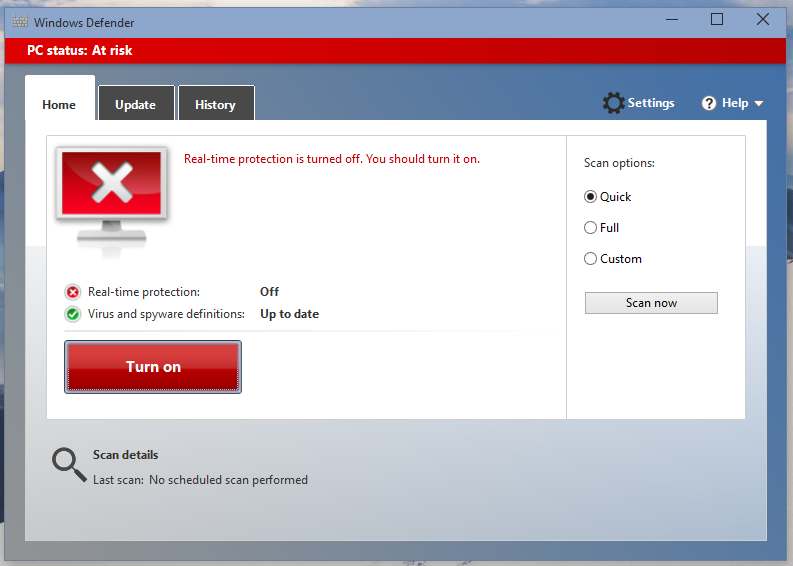
Windows Defender is the default antivirus app shipped with Windows 10. Earlier versions of Windows like Windows 8.1, Windows 8, Windows 7 and Vista also had it but it was less efficient previously as it only scanned spyware and adware. In Windows 8 and Windows 10, Defender is based on the Microsoft Security Essentials app which offers better protection by adding full blown protection against all kinds of malware. However, despite Microsoft's claims that it offers full protection, studies have found that third party antivirus apps still offer better protection. If you prefer to use a third party anti malware app, you might want to disable Windows Defender. Here is how you can disable it.
Option one
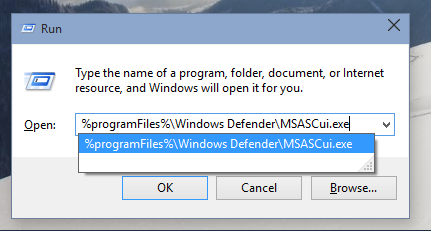
Windows Defender can be turned off via its preferences. To access it, you need to open the user interface of Windows Defender. To open it quickly, press Win + R on the keyboard (see the ultimate list of Win key shortcuts) and type the following in the Run box:
%ProgramFiles%\Windows Defender\MSASCui.exe
Windows 10 run defender UI Windows 10 Defender
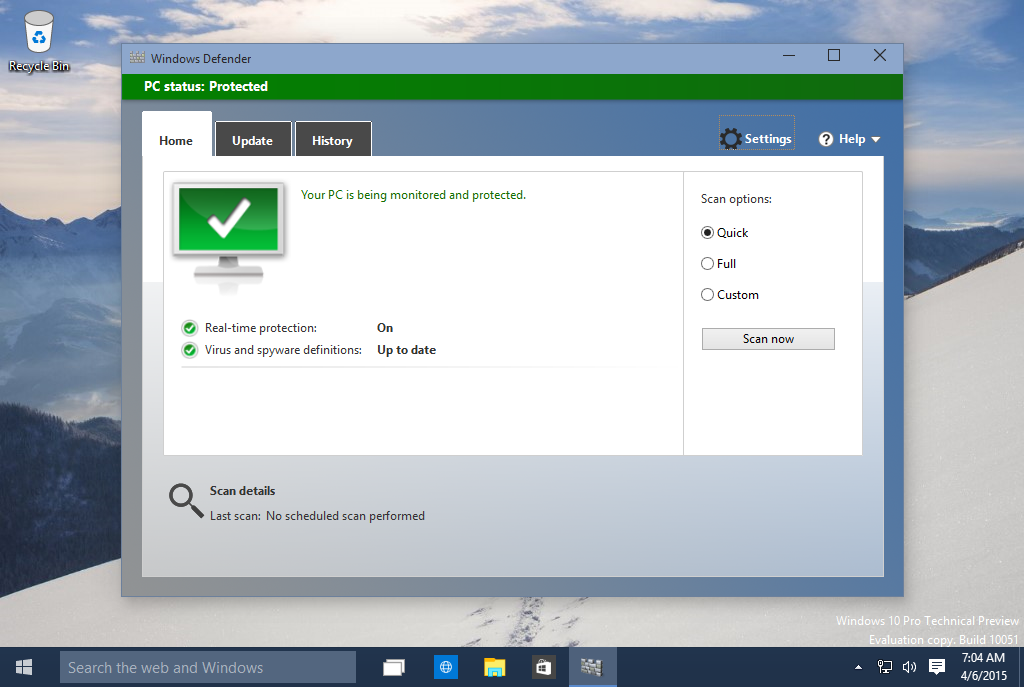
Run it and click on the Settings button.
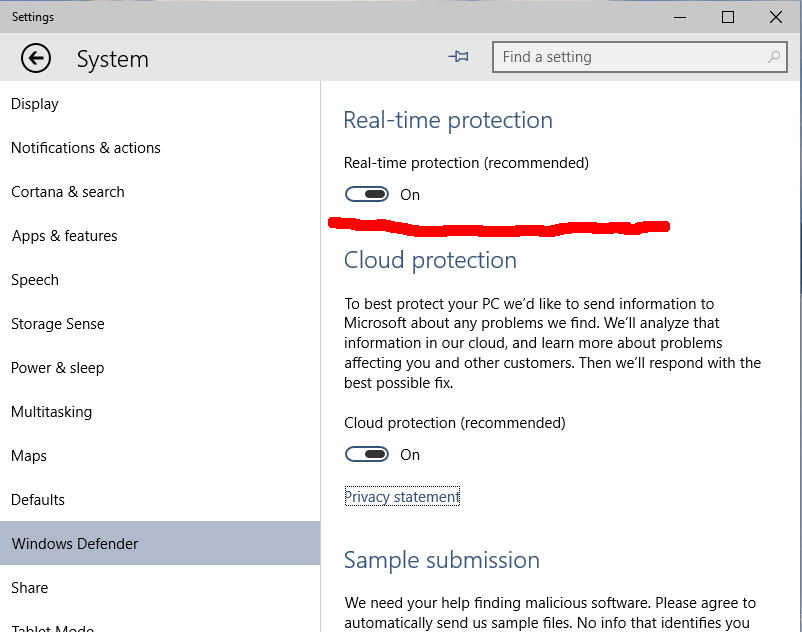
Windows 10 Defender Settings button The Settings app will be opened:
Windows 10 Disable Windows Defender
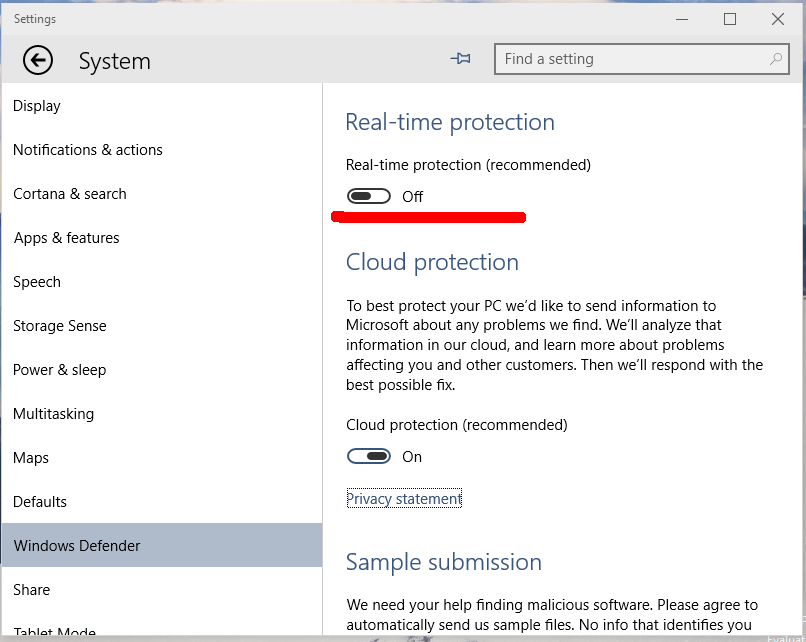
Toggle the "Real-time protection" option to Off. This will disable Windows Defender in Windows 10.
Windows 10 Defender Settings If you will open Windows Defender once again, it look as follows:
Windows 10 turn off Windows Defender
Option two
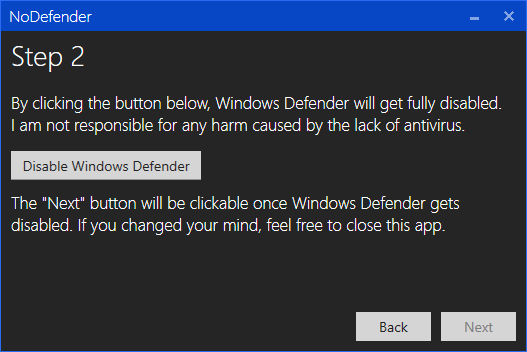
Many users report that in Windows 10, Defender is able to re-enable itself after you disable it. To prevent this, use the NoDefender app. nodefender step 2
NoDefender is a freeware which allows you to disable Windows Defender completely. Read the following article: NoDefender – Disable Windows Defender in Windows 10 with few clicks
Option three
If none of the tricks mentioned above work for you, try to disable Windows Defender with  Group Policy. Import the following registry tweak:
Windows Registry Editor Version 5.00
[HKEY_LOCAL_MACHINE\SOFTWARE\Policies\Microsoft\Windows Defender]
 “DisableAntiSpyware”=dword:00000001
[HKEY_LOCAL_MACHINE\SOFTWARE\Policies\Microsoft\Windows Defender\Real-Time Protection]
 “DisableBehaviorMonitoring”=dword:00000001
 “DisableOnAccessProtection”=dword:00000001
 “DisableScanOnRealtimeEnable”=dword:00000001
You need to reboot your PC.
Download ready-to-use registry files from here:
The undo file is included.
That's it. Please leave a comment about which method you tried and which worked for you. Thanks in advance.

Thursday, July 30, 2015

Total Windows 10 Key full


Windows 10 build 10166 activation keys

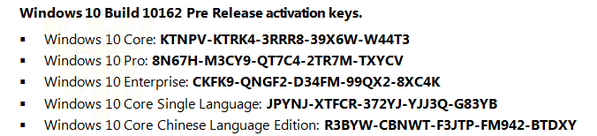
The activation keys are the same as for build 10162: 10162 keys
The text version:
Core: KTNPV-KTRK4-3RRR8-39X6W-W44T3
Pro: 8N67H-M3CY9-QT7C4-2TR7M-TXYCV
Ent: CKFK9-QNGF2-D34FM-99QX2-8XC4K

Make sure you can connect to the internet
To activate Professional try this
Right-click start, Command Prompt (admin)
Copy and paste the command and press enter
You should get a message - successful or failure
slmgr /ipk VK7JG-NPHTM-C97JM-9MPGT-3V66T
or
slmgr /ipk W269N-WFGWX-YVC9B-4J6C9-T83GX
then reboot and check activation
If it is still not activated manually enter each code
Yes, that did the trick! I used the first code, as it match with the key I was trying to enter. Thank you, much!!
Be the first person to mark this helpful  
 =======================================
These are the working keys for 10240.

    Windows 10 Home build 10240 - TX9XD-98N7V-6WMQ6-BX7FG-H8Q99
    Windows 10 Pro build 10240 - VK7JG-NPHTM-C97JM-9MPGT-3V66T
    Windows 10 Enterprise build 10240 - NPPR9-FWDCX-D2C8J-H872K-2YT43

How to activate Windows 10 build 10240


Many users who performed a clean install of Windows 10 build 10240 cannot activate it. That is because Microsoft has disabled the online activation until the end of July 2015. If you are interested in activating Windows 10 build 10240, here are a few simple steps for you to do that without using any cracks, hacks or third party software.

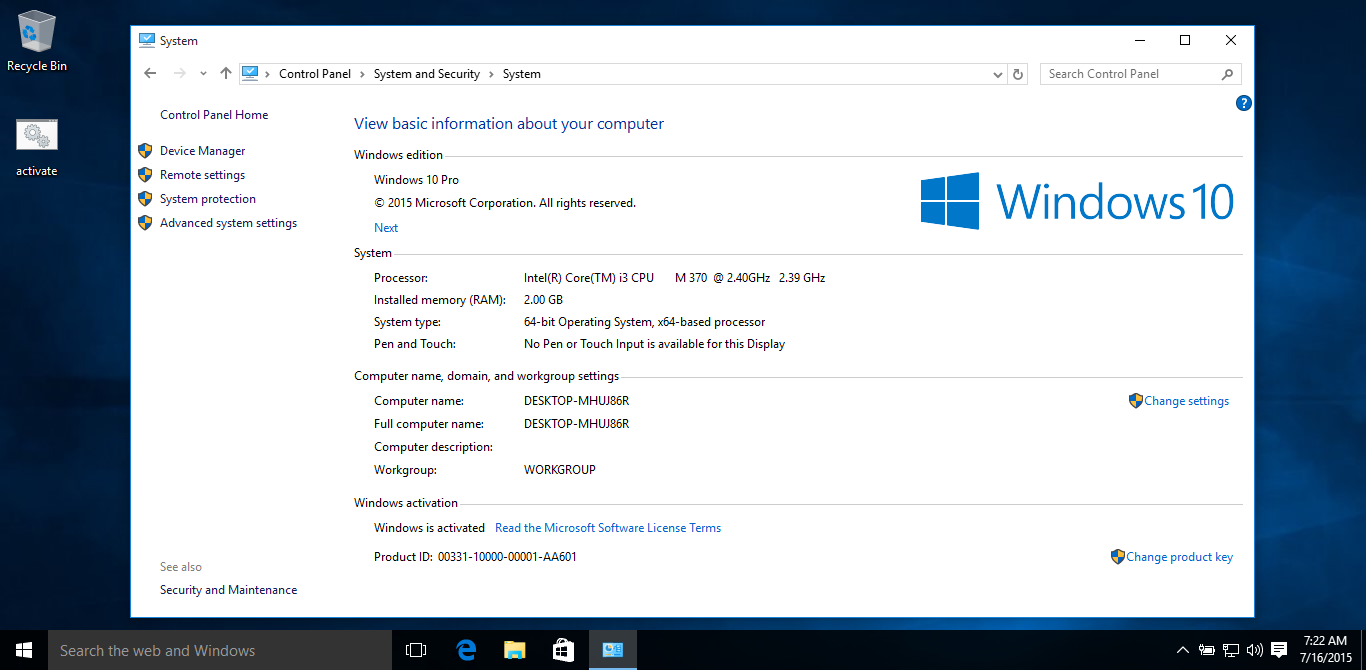
Windows 10 20240 activated
How to activate Windows 10 build 10240
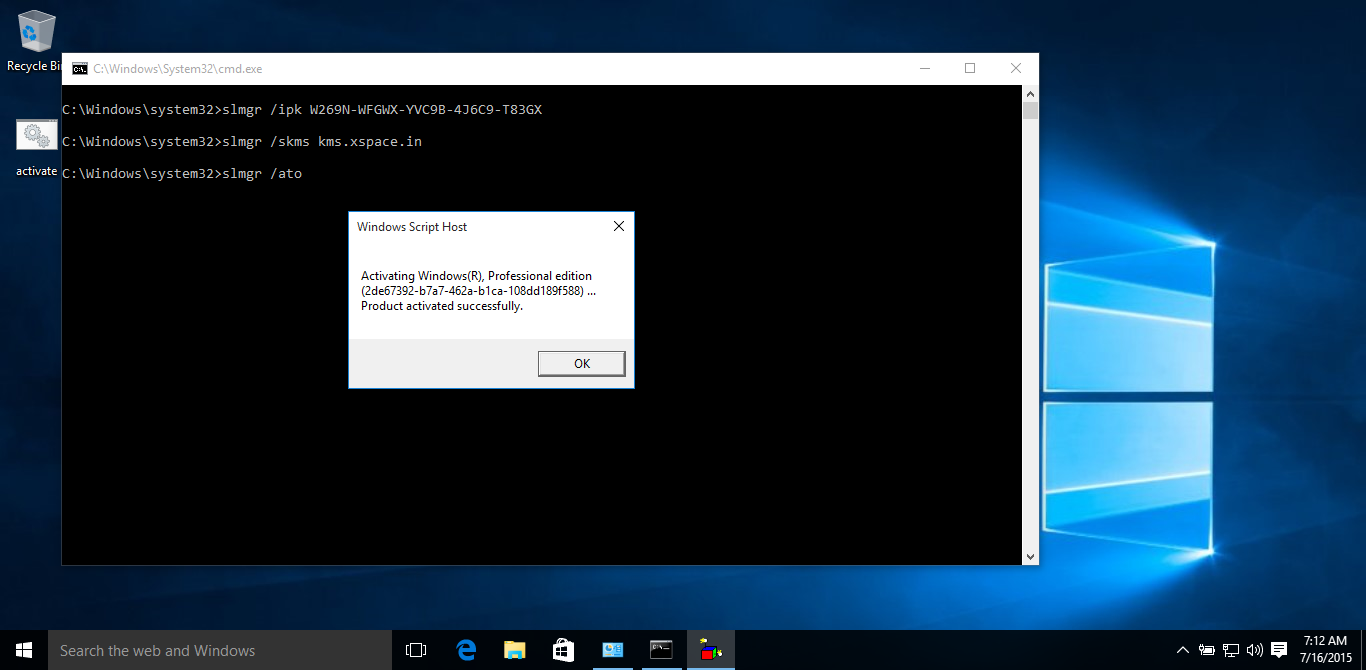
  1. Open an elevated command prompt.
  2. Type the following command and hit the Enter key:
    slmgr /ipk W269N-WFGWX-YVC9B-4J6C9-T83GX
    Wait for the message box popup that the key is installed.
  3. Now type the following command and press Enter
    slmgr /skms kms.xspace.in
    Again, wait for the message box.
  4. Finally, enter the following command:
    slmgr /ato
    After you hit the Enter key, Windows 10 build 10240 will become activated.
    Windows 10 20240 activation
You are done.

Wednesday, July 15, 2015

CÁC BÀI VIẾT CÓ GIÁ TRỊ CỦA NHẤT NGHỆ


10 BÀI VIẾT MỚI NHẤT:
10.Audit Policy-Windowns 2K8
09. Active Directory Recycle Bin
08.Data Protection Manager 2010 (DPM 2010)
07.Windows Deployment Service (WDS)
06. Khái Niệm Và Cách Cấu Hình VLAN (Phần 2&3)
05. Khái Niệm Và Cách Cấu Hình VLAN (Phần 1)
04. Symantec EndPoint Protection (Phần 3)
03. Symantec EndPoint Protection (Phần 2)  
02. Giải Pháp Virtual Desktop Infrastructure (VDI)
01. Symantec EndPoint Protection (Phần 1)


I – Windows Server 2003
39.Data Protection Manager 2010 (DPM 2010)
38.Windows Deployment Service (WDS)
37. Xác Định Thủ Phạm Gây Rối Trong LAN
36.Tạo Multiboot kèm chức năng Recovery
35. Setting Up Secure Wireless Access – Part1
34. Dùng Wireless Card trên máy tính làm Access Point
33. Deploy Office bằng file MST
32. Setting Up Secure Wireless Access – Part2
31. Giải pháp xử lý sự cố trên Domain Controller (DC)
30.Quản lý kết nối Internet không dây với Wireless Gateway Antamedia
29. Triển khai SQL 2005 Cluster trên windows 2003
28. Triển khai DHCP Cluster trên windows 2003
27. WEB SERVER SECURITY
26. Khai thác lỗi của DNS Server
25. Bảo mật website với SSL certificate của VeriSign.com
24. Cấu hình VPN Client to Gateway sử dụng L2TP/IPSec và chứng thực qua RADIUS Server
23. Gia tăng Độ Bảo Mật Khi Remote Desktop Bằng SSL
22. VPN L2TP/IPSEC sử dụng Certificate
21. ADSL Toàn Tập: Setup – Remote Admin – VPN
20. Install PHP – MySQL with IIS
19. FTP Server – AD Isolation Mode
18. Microsoft Deployment Toolkit Support Solution Accelarators
17. Đổi Tên Domain
16. Microsoft Media Services toàn tập
15. Phim Tạo file MSi+Deploy sotfware step by step
14. Webserver with ADSL
13. VPN Authentication SmartCard
12. Ghi nhận các sự kiện khi thực hiện kết nối VPN
12. Cài Windows qua mạng (dùng RIS)
11. Access-Based Enumeration
10. Import User từ danh sách cho trước
9. [IPSEC] Cấm duyệt Web
8. Limit Login
7. Xây dựng hệ thống mạng cho doanh nghiệp vừa và nhỏ
6. PHIM THIẾT LẬP VPN QUA ADSL (Client – Gateway)
5. Host multi domain with IIS – FTP server – Security with NTFS permission
4. Move User giữa hai forest
3. Thiết lập nhiều server chạy song song
3. SSL Toàn Tập
2. Cho phép User join hơn 10 workstation
1. Mdaemon : Setup multi-domain trên 1 server

II – Windows Server 2008 47.Audit Policy-Windowns 2K8
46. Active Directory Recycle Bin
45. Top 10 Bài Lab Quản Trị Mạng Version 2
44. Triển Khai BranchCache trên Windows Server 2008 R2
43. Deploying Active Directory Rights Management Services in an Extranet
42. Triển Khai VPN Reconnect trên Windows Server 2008 R2
41. Offline Domain Join
40. Một số Extension trên IIS7
39. Tạo và quản lý máy ảo với Hyper-V trên Windows Server 2008
38. Disaster Recovery For Windows Server 2008 (Part 3)
37. Disaster Recovery For Windows Server 2008 (Part 2)
36. Disaster Recovery For Windows Server 2008 (Part 1)
35. Cài đặt và cấu hình WINDOWS MEDIA SERVICES trên Windows Server 2008
34. Quản lý băng thông bằng Windows Quality of Service (QoS)
33. Đôi điều về ứng dụng SSTP trong VPN
32. Cấu hình DNS Server và Client
31. VPN Client To Gateway Using Radius Server On Windows Server 2008
30. Active Directory Federation Services (AD FS)
29. Windows Sever Virtualization
28. Triển khai DFS trên Windows Server 2008
27. Windows Deployment Service: Tạo Unattend File
26 . Windows Server 2008: TS Gateway và NAP (Network Access Protection)
25. Windows Server 2008: Các lý do để nâng cấp
24. TS Gateway Server
23. Ứng dụng PKI trên Windows Server 2008
22. Sử dụng Script tạo hàng loạt OU, Group và User Account tren Windows Sever 2008
21. Tích Hợp TS Web Access vào Windows SharePoint Services
20. DEPLOY PRINTERS BY USING GROUP POLICY ON WINDOWS SERVER 2008
19. Windows Deployment Service: Tạo Image và cài đặt Windows từ xa
18. Chia SITE trên Windows Server 2008
17. Hướng Dẫn Upgrade Hệ thống Server 2k3 lên 2K8
16. Configure TS Session Broker Load Balancing with DNS Round Robin
15. Windows Server 2008 – Dhcp Server Core
14. Windows Server 2008 – Terminal Services
13. BitLocker Drive Encryption
12. Windows Server 2008 – Fine-Grained Password Policies
11. Ứng dụng SSTP VỚi hệ thống VPN
10. Windows Server 2008 – AD Rights Management Services
9. Windows Server 2008 – Cài đặt Windows Server Core
8. Windows Server 2008 – Network Access Protection
7. Windows Server 2008 – File Server Resource Manager
6. Lab Windows Server 2008 + Vista
5. Windows Server 2008 – Windows Deployment Services
4. Windows Server 2008 – Internet Information Services (iis) 7.0
3. Windows Server 2008 – Windows Server Backup
2. Deploying Policies for Windows Firewall
1. Using Powershell In Windows Server 2008
III – Windows XP / Vista / Windows 7 5. Windows 7 hand On Lab (Step By Step)
4. Sao lưu phục hồi dữ liệu, phục hồi hệ thống trong Windows Vista
3. Một số tính năng trên Windows Vista
2. HOT – Video hướng dẫn sử dụng Windows Vista
1. Cài đặt IIS7 trên nền Windows Vista
IV – Exchange Server 40.Xây Dựng Hệ Thống Exchange 2010 – Trên Nền Ảo Hoá Với Độ Sẵn Sàng Cao
39. Triển Khai Exchange 2010 : Edge Transport Server Và Forefont Protection
38. Recovery exchange server 2007 (part 1)
37. DAG trong Exchange 2010
36. Exchange Database – Phần 2: Cluster Continuous Replication
35. Cấu Hình Resource Mailbox Sử Dụng Trong Outlook Web Access(OWA)
34. Tổng quan về Exchange Server 2010
33. Install Exchange Server 2010
32. Lập kế hoạch triển khai hệ thống Microsoft Exchange Server 2007
31. Tuyệt chiêu Exchange 2k7 với Exchange Management Shell
30. Phần 1 : Exchange Database – Local Continuous Replication
29. Exchange 2007: Anti Spam with Sender Reputation
28. Managing Exchange Server 2007 using a Windows XP
27. Giải Pháp Backup and Restore Mailbox Database
26. Backup And Restore Edge Transport Server Role
25. Control Exchange 2007 Attachments through OWA
24. Migrating from POP Server to Exchange 2007 using Microsoft Transporter
23. Recovery User Domain và User Mailbox từ Exchange Database Files
22. Exchange Connector
21. Triển khai Edge Transport Server trên hệ thống Exchange 2007
20. EXCHANGE SERVER 2007 : LOAD BALANCING HUB TRANSPORT
19. LOGON TO OUTLOOK WEB ACCESS (OWA) USING SMART CARDS
18. Giải quyết các phát sinh khi đổi certificate mặc định của Exchange server 2007
17. Windows SharePoint Services 3.0 và Incoming e-mail
16. Triển khai Unified Messaging trên Exchange 2007 thông qua IP PBX
15. Shared Mailbox
14. Cấu Hình ForeFront Security For Exchange 2K7
13. Setup 2 Exchange server chạy song song
12. RPC over HTTPS
11. Sharepoint Tích Hợp Với Exchange 2k7 Trong Việc Chia Sẻ File
10. Hướng dẫn install Exchange sever 2007 trên Window server 2008
9. Exchange 2007: Internet Protocol (Phần 3): RPC over HTTPs
8. Exchange 2007 – Internet Protocol: OWA (Phần 2)
7. Exchange 2007 – Internet Protocol – Phần 1
6. Hoàn chỉnh về Exchange 2003 Cluster
5. Linked Mail Box
4. Exchange 2k3: 1 Account – Multi Email Address
3. Upgrade to Exchange 2007
2. Exchange 2007 Resource Mailbox
1. Đổi Password Trên OWA
V – ISA Server 22. Dùng LDAP chứng thực Internet User trong ISA Server 2006 Stand Alone
21. How to migrate Microsoft ISA Server 2006 to Microsoft Forefront TMG
20. Tác động của remote access policy trên kết nối VPN (P.2)
19. Tác động của remote access policy trên kết nối VPN (P.1)
18. Sử dụng ISA SERVER 2006 hạn cế tấn công SQL Injection
17. Đọc file log .mdf trong isa server 2006
16. ĐÔI ĐIỀU VỀ CHỨC NĂNG CACHE TRÊN ISA SERVER
15. Publish multiple website by ISA Server 2006 over HTTPS
14. Enabling DHCP Relay for ISA 2006 Firewall VPN Clients
13. Publish TS Gateway server
12. Publish Windows Sharepoint Service 3.0 với ISA 2006
11. ISA SERVER 2006: NETWORK LOAD BALANCING
10. ĐÔI ĐIỀU VỀ CÀI ĐẶT ISA SERVER 2006
9. DMZ with ISA 2004 Back to Back
8. Cấu hình Publish Outlook Any Where Exchange Server 2007 và Secure Outlook Web Access với ISA Server 2006
7. Publish server on ISA 2004 DMZ
6. Một số Lab ISA Server 2006 từ Microsoft
5. ISA 2004 – Tạo Rule
4. Surf Control for ISA
3. Chứng thực cho ISA bằng RADIUS
2. Publish Mdeamon6 qua Isa (port 80)
1. ISA 2004 – Cài Đặt
VI – CEH 14. KHẢO SÁT MỘT SỐ CÁCH DETECT FIREWALL RULES
13.Khai thác qua Hidden Input
12. Idle-Scan Step-by-Step
11. Crack WEP KEY – ARPReplay method
10. Cài đặt BackTrack 3 Final lên đĩa cứng
9. DoS với HTTP POST
8. TCP Hijack – LAN
7. “Bào chế” trang web detect IP
6. Đọc trộm Yahoo Mail với Ferret, Cookie Editor & Cain
5. Danh sách các Hack Tool miễn phí tốt nhất
4. “Chôm” Password trong môi trường Switch
3. Chôm Pass Yahoo! và POP3
2. Proxy: Lợi và Hại
1. Chính sách bảo mật cho Web Server

VII – CISCO

14.Khái Niệm Và Cách Cấu Hình VLAN (Phần 2&3)
13. Khái Niệm Và Cách Cấu Hình VLAN (Phần 1)
12.Các Dịch Vụ WAN Thông Dụng
11. Implementing Routing Protocols
10. Route Selection trên router CISCO
9. Routing Policy trên CISCO router
8. IPSec Tunnel Windows và Cisco Router
7. Class _less routing protocol

6. VLSM, SUMMARY, Discontinues subnet
5. Giả Lập Router, SW, PIX với GNS3
4. Giả lập PIX – step by step
3. Giả lập switch học môn BCMSN CCNP
2. Đôi điều về IP Access-List trong IOS
1. DHCP – Cấu Hình Hoàn Chỉnh
VIII – LINUX
18.Video Triển Khai Hệ Thống Mạng Hoàn Chỉnh Trên Linux-Có Âm Thanh (Phần 11) 17. Video Triển Khai Hệ Thống Mạng Hoàn Chỉnh Trên Linux-Có Âm Thanh (Phần 10)
16. Video Triển Khai Hệ Thống Mạng Hoàn Chỉnh Trên Linux-Có Âm Thanh (Phần 9)
15. Video Triển Khai Hệ Thống Mạng Hoàn Chỉnh Trên Linux-Có Âm Thanh (Phần 8)
14. Video Triển Khai Hệ Thống Mạng Hoàn Chỉnh Trên Linux-Có Âm Thanh (Phần 7)
13. Video Triển Khai Hệ Thống Mạng Hoàn Chỉnh Trên Linux-Có Âm Thanh (Phần 6)
12.Video Triển Khai Hệ Thống Mạng Hoàn Chỉnh Trên Linux-Có Âm Thanh (Phần 5)
11.Video Triển Khai Hệ Thống Mạng Hoàn Chỉnh Trên Linux-Có Âm Thanh (Phần 4)
10.Video Triển Khai Hệ Thống Mạng Hoàn Chỉnh Trên Linux-Có Âm Thanh (Phần 3)
9.Video Triển Khai Hệ Thống Mạng Hoàn Chỉnh Trên Linux-Có Âm Thanh (Phần 2)
8.Triển khai snort trên CentOS
7. Video Triển Khai Hệ Thống Mạng Hoành Chỉnh Trên Linux (Cập nhật ngày 15-03-2010)
6. Linux Advance
5. Linux toàn tập
4. Giới thiệu về IPCop
3. RAS trên Linux Server
2. Hướng dẫn cài VMware + Linux CentOS
1. Giới thiệu về CentOS
IX – Other 84. Symantec EndPoint Protection (Phần 3)
83. Symantec EndPoint Protection (Phần 2)
82. Giải Pháp Virtual Desktop Infrastructure (VDI)
81. Symantec EndPoint Protection (Phần 1)
80. PFSENSE (Phần 5)
70. PFSENSE (Phần 4)
69.PFSENSE (Phần 3)
68.PFSENSE (Phần 2)
67. PFSENSE (Phần 1)
66.Phim Cài Đặt Và Triển Khai Office Communication Server 2007 từ A – Z (Phần 4)
65.Phim Cài Đặt Và Triển Khai Office Communication Server 2007 từ A – Z (Phần 3)
64.Phim Cài Đặt Và Triển Khai Office Communication Server 2007 từ A – Z (Phần 2)
63.Phim Cài Đặt Và Triển Khai Office Communication Server 2007 từ A – Z (Phần 1)
62. PKI & thương mại điện tử – Phần 3
61. Triển khai 3CX Site to Site
60. PKI & thương mại điện tử – Phần 2
59. PKI & thương mại điện tử – Phần 1
58. PKI & thương mại điện tử – Phần 2
57. Phần 2: Triển khai hệ thống VOIP bằng phần mềm 3CX
56. Phần 1: Các khái niệm về VoIP
55. Configure Forefront TMG to integrate with an TMG Array Phần 1
54. Quản lý máy ảo Hyper-V bằng System Center Virtual Machine Manager (Phần 1)
53. Tìm hiểu các số Sequence và số ACK, Destination Port và Source Port trong TCP Header
52.Windows 7 user profile
51. Plesk Control Panel Phần 2: Khảo sát giao diện và các tính năng của Plesk
50. Microsoft Application Virtualization 4.6
49. Tạo máy ảo trong Hyper-v từ đĩa cứng ảo của Microsoft Virtual PC
48. Một số tính năng mới trong Windows 7
47. Chuyển đổi máy ảo Microsoft Virtual PC vào Hyper-V
46. Giới thiệu giao thức TCP
45. Từ BOOTP đến DHCP
44. Solaris 10: Bài 4: Install Software
43. Tổng quan Trust Relationship – Phần 2
42. Tổng quan về TRUST RELATIONSHIP – Phần 1
41. Solaris 10 – Bài 3: Giới thiệu và cấu hình DHCP
40. Microsoft Forefront Client Security (RPC)
39. CƠ CHẾ HOẠT ĐỘNG CỦA REMOTE PROCEDULE CALL (RPC)
38. Solaris 10: Bài 2 Cài đặt dịch vụ DNS
37. HƯỚNG DẪN XÂY DỰNG MÔ HÌNH MẠNG VỚI VMWARE
36. Hệ thống đĩa RAID
35. Các Giải Pháp Phòng Chống Sử Dụng Thiết Bị Di Động
34. Quản trị Hệ điều hành Solaris 10
33. DPM2007 – Backup & Restore Microsoft Exchange Server 2007
32. Giới thiệu và cài đặt Microsoft Office Project 2007
31. End User Recovery – Tạo Protection Groups
30. System Center Operation Manager 2007 (Part 1)
29. Overview System Center Data Protection Manage 2007
28. Giới thiệu về System center essentials 2K7 và hướng dẫn cài đặt chi tiết
27. Thiết lập Hotspot chỉ với 1 Laptop trong 10 phút
26. Oracle rac (real application clusters)
25. Giới thiệu và cấu hình IBM DS3X00 storage
24. Cài đặt và cấu hình Forefront Threat Management Gateway (TMG)
23.Quản lý kết nối Internet không dây với Wireless Gateway Antamedia
22. Install Microsoft Office Sharepoint Server 2007 on Windows Server 2008
21. Offices Communication Server 2007
20. GIẢI PHÁP MAIL VÀ INSTANT MESSAGING VỚI WINDOWS LIVE CUSTOM DOMAINS
19. Wireless Overview
18. Tổng Quan Về Server Cluster
17. WEB,MAIL ONLINE với IP động
16. CÀI ĐẶT VÀ SỬ DỤNG SERVER ẢO VỚI MICROSOFT VIRTUAL SERVER 2005 RC2
15. SOẠN LAB ONLINE VỚI GOOGLE DOCS
14. Loadbalancing và Failover nhiều line ADSL bằng Kerio WinRoute Firewall
13. Mail Offline và Relay Ver 1.0
12. Giải pháp mail cho doanh nghiệp không có IT
11. Public key infrastructure (PKI)
10. Cách NAT port trên một số modem thông dụng ( sưu tầm internet)
9. Phim cấu hình Wireless chứng thực bằng RADIUS
8. Tổng Quan về IPV6
7. Giải Pháp Mail Cho Doanh Nghiệp Vừa và Nhỏ
6. Config phpmyadmin and Create music website
5. Tìm hiểu về Kerberos
4. Cấu hình Mdeamon làm Mail Online với Zoneedit
3. Phim cấu hình ADSL chế độ Bridge
2. TCP/IP căn bản
1. Mail & Relay NGƯỜI MỚI NÊN VÀO
X – SHAREPOINT SERVER 6. Đồng bộ dữ liệu giữa Microsoft Office Groove 2007 và Microsoft SharePoint Products and Technologies
5. Triển khai Workflow bằng Sharepoint Designer 2007
4. Ứng dụng Workflow cho doanh nghiệp – Phần 1: Ứng dụng Approval Workflow
3. Xây dựng Blog host dựa trên Publishing Site (Part 3)
2. Xây dựng Blog host dựa trên Publishing Site (Part 2)
1. Xây dựng Blog host dựa trên Publishing Site (Part 1)

Saturday, May 23, 2015

How to Setup MultiPath (MPIO) with Nimble Storage and Citrix XenServer


Hi All Friends,

Here's a follow up to my Citrix XenServer blog that showed you how to attach Nimble Storage to XenServer.  This article will show you how to set up MPIO with Nimble and XenServer.  It was written by a colleague of mine, so a HUGE thanks to Klaus Kupfer!!


 1.  Configure each Data Interface on the Nimble Array to a different subnet.


2. Configure Multipathing on the XEN Host
      a.       Put XEN Server in Maintenance Mode


 b.      Access XEN Server Properties


c.       Enable Multipathing
d.      Exit Maintenance Mode


3. Check that the XEN Server NIC’s are in the same subnets as the Nimble Data Interfaces


4.  Edit the /etc/multipath.conf File using console
  
device {
vendor                                    "Nimble"
product                                  "Server"
path_selector                         "round-robin 0"
path_grouping_policy           group_by_serial
rr_weight                                priorities
rr_min_io                                10
path_checker                         tur
failback                                   manual
no_path_retry                        20
}

5.  Reboot the XEN Server
6. Create New SR 
     a.       Obtain initiator IQN
     b.      Configure Volume on Nimble on Nimble array with all desired settings and LUN initiator groups


c.       Choose New SR...


d.  Choose "Software iSCSI“ as Storage Type


e.       Configure a name for the SR


f.        Enter the iSCSI Discovery AddressThen click first  "Discover IQNs“ and then "Discover LUNs“ The configured Volume should appear in the list


 g.  Finished

Didja Know? VMware Converter for Correcting Misalignment!


Hi All,

Another in my series of "Didja Know?"  This might be old news to you, but I just found out that version 5 of the VMware vCenter Converter will fix virtual machine misalignment!  So what is misalignment and why should you care?  That's a blog all in its own, but basically it's when the guest file system doesn't match the block boundaries of the storage system.  Okay, so what?  The problem is data gets split between storage blocks and you get partial reads and writes to many more blocks than you would need if the storage and OS were aligned.  This can result in a lot more work on your storage device than is necessary.  For those that don't know, this is much more common than you realize and just until recently OS's had alignment issues with many storage vendors.  Here's a really good paper that explains misalignment in great detail!

There are a lot of tools to correct misalignment and the best practice is to fix it before you even put a machine into production.  Today I'm going to show how VMware vCenter Converter can fix alignment.  VMware vCenter Converter is normally a tool to convert physical machines into virtual machines, but I was delighted to hear that they added this feature!

Below I'm using the NetApp Virtual Storage Console to clone a Windows XP machine.  The VSC tells me the machine is misaligned and if I'd like to proceed with the clone?  If I proceed, I will carry over the misalignment to the clone.  VSC has tools built in to correct misalignment as well, but that's a demonstration for another day.


So let's fix the problem!  I run the VMware Converter and tell it that I want to Convert a machine.


 Select where the misaligned machine lives and the machine itself.


Enter the credentials of the vCenter you'd like the converted machine to go to.


Give the new machine a name and where it should be located.


Select the datastore the machine should live on and what virtual machine version you'd like.


Click on "Data to copy".


Here's where things change!  Choose, "Select volumes to copy". 


Ensure the "Create optimized partition layout" is checked.  This will correct the misalignment on the clone.


Once the convert is completed use the VSC to check for misalignment.  Here I do a "Create Rapid Clones".  This time you can see the converted virtual machine past the misalignment scan because it is now aligned!


I hope you enjoyed this "Didja Know" and that it will help keep your environment misalignment free!

 
Design by IT Manager | Bloggerized by Themes For IT Managers | MIS-DUONG