Translate

Saturday, May 23, 2015

How to Setup MultiPath (MPIO) with Nimble Storage and Citrix XenServer


Hi All Friends,

Here's a follow up to my Citrix XenServer blog that showed you how to attach Nimble Storage to XenServer.  This article will show you how to set up MPIO with Nimble and XenServer.  It was written by a colleague of mine, so a HUGE thanks to Klaus Kupfer!!


 1.  Configure each Data Interface on the Nimble Array to a different subnet.


2. Configure Multipathing on the XEN Host
      a.       Put XEN Server in Maintenance Mode


 b.      Access XEN Server Properties


c.       Enable Multipathing
d.      Exit Maintenance Mode


3. Check that the XEN Server NIC’s are in the same subnets as the Nimble Data Interfaces


4.  Edit the /etc/multipath.conf File using console
  
device {
vendor                                    "Nimble"
product                                  "Server"
path_selector                         "round-robin 0"
path_grouping_policy           group_by_serial
rr_weight                                priorities
rr_min_io                                10
path_checker                         tur
failback                                   manual
no_path_retry                        20
}

5.  Reboot the XEN Server
6. Create New SR 
     a.       Obtain initiator IQN
     b.      Configure Volume on Nimble on Nimble array with all desired settings and LUN initiator groups


c.       Choose New SR...


d.  Choose "Software iSCSI“ as Storage Type


e.       Configure a name for the SR


f.        Enter the iSCSI Discovery AddressThen click first  "Discover IQNs“ and then "Discover LUNs“ The configured Volume should appear in the list


 g.  Finished

Didja Know? VMware Converter for Correcting Misalignment!


Hi All,

Another in my series of "Didja Know?"  This might be old news to you, but I just found out that version 5 of the VMware vCenter Converter will fix virtual machine misalignment!  So what is misalignment and why should you care?  That's a blog all in its own, but basically it's when the guest file system doesn't match the block boundaries of the storage system.  Okay, so what?  The problem is data gets split between storage blocks and you get partial reads and writes to many more blocks than you would need if the storage and OS were aligned.  This can result in a lot more work on your storage device than is necessary.  For those that don't know, this is much more common than you realize and just until recently OS's had alignment issues with many storage vendors.  Here's a really good paper that explains misalignment in great detail!

There are a lot of tools to correct misalignment and the best practice is to fix it before you even put a machine into production.  Today I'm going to show how VMware vCenter Converter can fix alignment.  VMware vCenter Converter is normally a tool to convert physical machines into virtual machines, but I was delighted to hear that they added this feature!

Below I'm using the NetApp Virtual Storage Console to clone a Windows XP machine.  The VSC tells me the machine is misaligned and if I'd like to proceed with the clone?  If I proceed, I will carry over the misalignment to the clone.  VSC has tools built in to correct misalignment as well, but that's a demonstration for another day.


So let's fix the problem!  I run the VMware Converter and tell it that I want to Convert a machine.


 Select where the misaligned machine lives and the machine itself.


Enter the credentials of the vCenter you'd like the converted machine to go to.


Give the new machine a name and where it should be located.


Select the datastore the machine should live on and what virtual machine version you'd like.


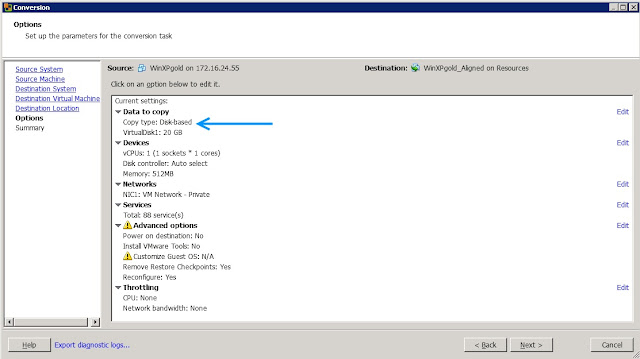
Click on "Data to copy".


Here's where things change!  Choose, "Select volumes to copy". 


Ensure the "Create optimized partition layout" is checked.  This will correct the misalignment on the clone.


Once the convert is completed use the VSC to check for misalignment.  Here I do a "Create Rapid Clones".  This time you can see the converted virtual machine past the misalignment scan because it is now aligned!


I hope you enjoyed this "Didja Know" and that it will help keep your environment misalignment free!

Cisco UCS 101 - VLAN's made easy


Hi Friends,

If you're like me you know just enough networking to be dangerous.  Sure I can log into a Cisco switch and add new machines to an existing VLAN and other simple things, but create a VLAN?  I'd have to do some Googling to do that!  I've been working with a Cisco UCS and I have to say this thing is VERY cool!  When you're working in a lab environment you'll soon discover you start bumping into your neighbors, accidentally use their DHCP addresses, AD server etc.  You can create new private IP ranges, but since you're on the same VLAN you'll start effecting each others work.

An easy way to segment your work off from your neighbors is to create a VLAN that your servers and storage can be dedicated to.  In a traditional world that involves tracing cables to ports, creating new VLANs on the switch, you know time consuming stuff!  Today I'm going to show you how easy it is to create a VLAN on a Cisco UCS.

1.  Log into your UCS Manager and click on the LAN tab.


2.  Find the Appliances cloud and expand it.  Now remember your UCS will probably look different then mine, so keep that in mind.  Find VLANs, right click on it and select Create VLANs.


3.  Give your new VLAN a name and a number.  You can give a range too, but I'm just doing simple stuff so I just give mine a single number.  Click OK when you're happy.


4.  Guess what?  You just created a VLAN!  Now for all the GUI haters out there I know you could have done this in probably half the time, but I still think it's cool!

So what to do with this new VLAN?  If you already have some virtual NICs in your blades or rack mounts you can apply this new VLAN to one of the vNICs.  If you don't have any free vNICS that can be segmented off, you can create a new vNIC!  How cool is that?!  If I seem excited it's because I am.  When I was a Sys Admin if you wanted to do this it meant actually adding a card to the box!

Let's add this VLAN to an existing vNIC.

5.  Click on the Servers tab at the top of the UCS Manager.


6.  Expand the tree until you find the server and vNIC you want to add the VLAN to.


7.  On the right hand side of the UCS Manager find Modify VLANs and click it.


8.  A window will open with all of your VLANs.  Deselect the VLAN you no longer want to be part of and select the one you do.  Here I deselect hyperv and select test.  Click OK to finish.


There you go, that's it!  That server now has a VLAN separated from everything else unless it's on that same 100 VLAN.

Until Next Time!
-Brain

Dân IT xây dựng thương hiệu cá nhân như thế nào?


Đối với “dân IT”, những người thường quen với code và màn hình vi tính hơn giao tiếp xã hội, làm thế nào để xây dựng một thương hiệu cá nhân thuyết phục?
chris
Chris Shayan – Giám đốc Công Nghệ Thông Tin VietnamWorks
[ The original article in English can be found HERE. ]
Hiện nay việc xây dựng một thương hiệu riêng cho bản thân là một việc rất cần thiết. Bạn có biết, khi ai đó nhắc đến bạn, tên thương hiệu của bạn sẽ xuất hiện ngay trong suy nghĩ của người đó. Nó cũng giống như việc từ Google được sử dụng quá thông dụng đến nỗi khi nhắc đến “Google” thì mọi người sẽ nghĩ ngay đến từ “search” (tìm kiếm).

Vậy làm sao để xây dựng thương hiệu cá nhân của mình? Có rất nhiều cách, tùy theo bạn làm trong ngành nào sẽ có cách riêng để xây dựng thương hiệu cá nhân đó. Hãy nhớ, bạn không phải đang xây dựng một nghề nghiệp, một chức vụ, mà là xây dựng một thương hiệu của chính bạn. Sau đây là những cách mà một dân công nghệ có thể xây dựng thương hiệu cá nhân cho mình:

  1. Thường xuyên theo dõi trang TechLooper để biết được xu hướng kỹ năng CNTT mà thị trường đang cần, nhà tuyển dụng nào đang cần kỹ năng đó. Việc theo dõi các biến chuyển của thị trường này giúp bạn dễ dàng kết nối và đứng cùng hàng ngũ với các chuyên gia am hiểu về ngành nghề.
  2. Tạo một Profile ấn tượng trên LinkedIn và cố gắng có được nhiều lời khen (Recommendation) tốt
  3. Hãy là một người năng động trên Twitter, theo dõi (follow) các chuyên gia, nhà sáng lập và những tài năng CNTT nổi tiếng.
  4. Có một trang blog hoặc website của chính mình, cố gắng cập nhật bài mới mỗi ngày hay mỗi tuần.
  5. Có một dự án nguồn mở trên GitHub
  6. Là một thành viên năng động trên những trang cung cấp nội dung như Tinhte, diễn đàn Công nghệ…
  7. Tạo các đoạn video, audio dưới dạng trình chiếu và chia sẻ chúng trên SlideShare
  8. Tìm kiếm những sự kiện IT hay trên MeetUp và tham gia.
Bạn đã thành công trong việc xây dựng thương hiệu riêng cho bản thân chưa? Chia sẻ câu chuyện của bạn trong phần Comment nhé.

Bạn đứng ở đâu trong thị trường nhân tài ngành IT?
TechLooper (http://techlooper.com/) áp dụng các công nghệ mới nhất, cho phép thực hiện phân tích dữ liệu nghề nghiệp chuyên về ngành IT. Nền tảng này cho phép các chuyên gia Công nghệ thông tin trên khắp Việt Nam truy cập, và biết được thống kê chính xác nhất về tỉ lệ % các kĩ năng/xu hướng IT ‘hot’ nhất hiện nay.
Hai chức năng chính của TechLooper:

  • Biết kỹ năng nào đang được ưa chuộng
  • Để mắt đến kỹ năng được trả lương cao nhất
  • Có trong tay các công ty cần kỹ năng của bạn
Đánh Giá Thu Nhập
  • Xem báo cáo tiền lương của bạn
  • Hiểu được mức lương của bạn cao hay thấp
  • Hoạch định bước tiếp theo trong sự nghiệp của bạn
Các thống kê sẽ được thể hiện dưới dạng biểu đồ một cách trực quan và sinh động nhất. Dữ liệu việc làm toàn ngành IT trên VietnamWorks cũng được thể hiện trên website này, cùng với các hoạt động trao đổi trực tiếp trên diễn dàn sẽ được phát triển trong thời gian tới, sẽ tạo nên một không gian thật sự hấp dẫn dành cho dân công nghệ.
- HR Insider / VietnamWorks –

 
Design by IT Manager | Bloggerized by Themes For IT Managers | MIS-DUONG